Proxy Servers
A Proxy Server is the top-level Configuration Item that represents a specific USP Server instance. It defines how the USP Manager connects to and manages that instance remotely. Key configuration fields include:
- The hostname and port of the target USP Server instance.
- The certificates for mutual TLS (mTLS) authentication:
- The CA Certificate that verifies the TLS Certificate presented by the USP Server.
- The TLS Certificate that identifies the USP Manager to the USP Server.
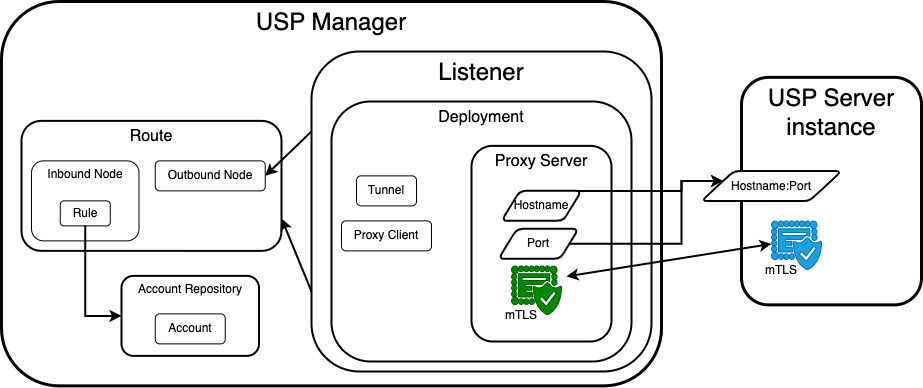
Once a Proxy Server is defined, one or more Deployments need to reference it. This relationship includes all the components needed for a USP Server instance to be functional (Tunnels, Proxy Clients, Listeners, Routes, etc.).
Both the TLS Certificate and CA Certificate must be added to the USP Manager before creating a Proxy Server configuration.
Before You Begin
Proxy Server's Role Within USP Manager
On its own, a Proxy Server contains only basic connection details: the hostname and port of the target USP Server instance, along with the mutual TLS (mTLS) certificates required for secure communication between the USP Manager and the USP Server.
Its role becomes central once a Deployment is associated with it. At that point, the Proxy Server acts as the anchor that ties all necessary Configuration Items together to make the USP Server fully operational.
A typical Deployment includes:
- A reference to a Proxy Server.
- A reference to a Listener, which references a Route and selects one of its Outbound Nodes.
- The Route contains:
- At least one Inbound Node, which processes incoming traffic and applies a Rule that defines authentication behavior.
- At least one Outbound Node, which specifies the internal target for forwarding traffic and must be selected by the Listener.
- The Route contains:
- A Tunnel, which allows the USP Server to accept reverse connections from a Proxy Client.
- A Proxy Client, representing the USP Client instance that connects through the Tunnel.
Once these elements are defined and connected through the Proxy Server and its associated Deployment, the USP Manager has everything required to push a complete, validated configuration to the specific USP Server instance referenced by the Proxy Server.
USP Manager and USP Server Authentication with mTLS
Communication between the USP Manager and the USP Server is secured using mutual TLS (mTLS) authentication, which ensures that both parties verify each other's identities. This requires two sets of credentials, each consisting of a CA Certificate, a TLS Certificate, and a corresponding private key:
- One set is configured on the USP Server instance, defined in its
.hclconfiguration file. - The other set is configured on the USP Manager, specified in the Proxy Server configuration associated with the target USP Server.
| Configuration Context | CA Certificate | TLS Certificate | Private Key |
|---|---|---|---|
USP Server (defined in its .hcl configuration file) | Configured using the web.tls.ca parameter, which is the path to the CA Certificate used to validate the TLS Certificate presented by the USP Manager. | Configured using the web.tls.cert parameter, which is the path to the TLS Certificate identifying the USP Server. | Configured using the web.tls.key parameter, which is the path to the private key corresponding to the TLS Certificate. |
| Proxy Server (configured in USP Admin UI) | Selected from the CA Certificate dropdown when creating the Proxy Server. | Selected from the TLS Certificate dropdown when creating the Proxy Server. | Specified in the Private Key field when creating the TLS Certificate. |
For more information on mTLS authentication, refer to Certificates.
Proxy Server Administration
Adding a Proxy Server
To add a Proxy Server, follow these steps:
- From the Sidebar, click Configuration > Proxy Servers.
- Click Add Proxy Server.
- Complete the details for the new Proxy Server using the Field Descriptions table as a guide.
- Click Save.
Field Descriptions
| Name | Description | Specifications | Required |
|---|---|---|---|
| Name | The name of the Proxy Server. |
| Yes |
| Description | The description of the Proxy Server. | No | |
| Hostname | Hostname or IP Address of the USP Server instance. | The Port and Hostname combination must be unique. | Yes |
| Port | Port number of the USP Server instance. |
| Yes |
| CA Certificate | The CA certificate used to validate the USP Server's TLS certificate. |
| Yes |
| TLS Certificate | The TLS certificate used by the USP Manager to connect to the USP Server. |
| Yes |
| HSM Connection | The HSM Connection used by the USP Server instance to retrieve TLS Certificates and Private Keys. | Must reference an already created HSM Connection. | No |
Editing a Proxy Server
To edit a Proxy Server, follow these steps:
- From the Sidebar, click Configuration > Proxy Servers.
- Click the row of the Proxy Server you want to edit.
- Click the Edit button above the Proxy Server details.
- Edit the details of the Proxy Server using the Field Descriptions table as a guide.
- Click Save.
If you modify a Proxy Server that is currently in use by a USP Server instance, the changes will not take effect until you manually apply the updated configuration by pushing it to the server. To apply the changes:
- Navigate to Monitoring > Status.
- Click the Name of the associated USP Server instance.
- Go to the Configuration tab.
- Review the pending changes in the Updated Configuration column.
- If the changes are correct, click Push Configuration.
Proxy Server Metadata
Proxy Server details include all parameters given in the Field Descriptions table above, plus the following read-only metadata:
| Name | Description |
|---|---|
| ID | Universally Unique Identifier of this Proxy Server. |
| Configuration Version | Version number of the last pushed configuration to the Proxy Server's corresponding USP Server instance. |
| Configuration Updated | Timestamp of the last configuration update pushed to its corresponding USP Server instance. |
| Created At | Date and time this Proxy Server was created. |
| Updated At | Timestamp of the last time the Proxy Server was modified or a configuration was pushed to its associated USP Server instance. |
Deleting a Proxy Server
To delete a Proxy Server, follow these steps:
- From the Sidebar, click Configuration > Proxy Servers.
- Click the row of the Proxy Server you want to delete.
- Click the Delete button above the Proxy Server details.
- You will be asked to confirm the deletion. Click Delete.
USP Manager prevents deletion of a Proxy Server if it is currently referenced by another Configuration Item.
Additionally, if the Proxy Server is used by a USP Server instance, the updated configuration must be manually applied. To apply the changes:
- Navigate to Monitoring > Status.
- Click the Name of the associated USP Server instance.
- Go to the Configuration tab.
- Review the pending changes in the Candidate Configuration - Preview section.
- If the changes are correct, click Push Configuration.
The changes do not take effect on the server until this step is completed.
Managing a Proxy Server
Managing a Proxy Server involves monitoring the operational state and configuration of its corresponding USP Server instance. This is done through the Status page in the USP Admin UI, which provides a centralized view where Users can:
- Monitor live status of the USP Server's Listeners and Tunnels, including their current state (e.g., running or stopped).
- Start or stop individual Listeners and Tunnels directly from the interface.
- View the current Running Configuration metadata, including:
- Configuration Version
- Last Updated Timestamp
- Host and Port information
- TLS and CA Certificate identifiers
- Compare the current Running Configuration to a Candidate Configuration, with a visual diff of changes.
- Push updated configurations to the USP Server in a controlled and versioned manner.
To access a specific USP Server's status:
- From the Sidebar, click Configuration > Proxy Servers.
- Click the name of the USP Server associated with the Proxy Server.
For more information, refer to Status.