Deployments
A Deployment defines how a Listener is launched on a specific USP Server instance, bridging the configuration defined in USP Manager with the server's active runtime environment. It includes several key settings that control how the Listener operates in a given context:
- Specifies which USP Server instance the Listener should run on.
- Defines whether the Listener starts automatically or requires manual activation.
- Optionally enables connections to internal targets or directory services through secure tunnels.
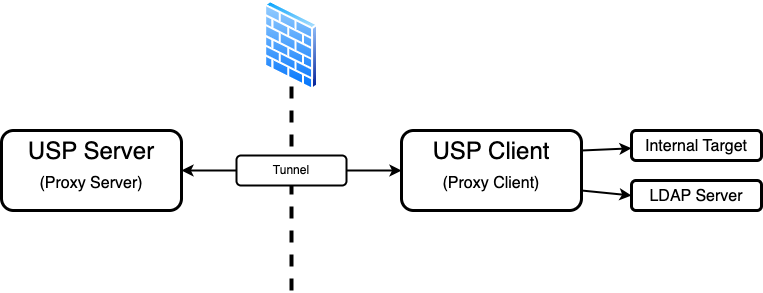
Tunneling configurations are required when the USP Server is deployed in a DMZ with no direct network access to internal targets, or LDAP and ICAP servers.
Before You Begin
Startup Modes
Controls how the associated Listener is activated on the USP Server instance. The available options are:
- Auto: The Listener starts automatically during USP Server initialization.
- Manual: The Listener must be started manually after the USP Server is running.
Tunneling Configurations
In scenarios where the USP Server cannot directly reach internal systems due to firewall restrictions, tunneling must be configured to bridge the connection.
Target Connection
To connect to internal targets behind a firewall, you must define the following:
- Tunnel: Defines the USP Server-side listener for incoming USP Client connections.
- Proxy Client: Represents the USP Client instance that establishes a secure tunnel to the USP Server.
If a Tunnel is configured, a matching Proxy Client must also be provided.
LDAP and ICAP Connection
To reach LDAP and ICAP servers behind a firewall, you must define the following:
- Tunnel for Other Services (LDAP, ICAP, etc.): Specifies the Tunnel through which communication with other services is established.
- Proxy Client for Other Services (LDAP, ICAP, etc.): Represents the USP Client used to route the request to the service through the Tunnel.
If a Tunnel for Other Services (LDAP, ICAP, etc.) is provided, a corresponding Proxy Client for Other Services (LDAP, ICAP, etc.) must also be specified.
Deployment Administration
Adding a Deployment
To add a Deployment, follow these steps:
- From the Sidebar, click Configuration > Listeners.
- Click the row of the Listener you want to deploy.
- Go to the Deployments tab.
- Click the Add Deployment button.
- Complete the details for the new Deployment using the Field Descriptions table as a guide.
- Click Save.
Field Descriptions
| Name | Description | Specifications | Required |
|---|---|---|---|
| Proxy Server | The target USP Server instance. |
| Yes |
| Startup Mode | The behavior of the Deployment upon startup of the USP Server instance. Options:
| Yes | |
| Description | The description of the Deployment. | No | |
| Tunnel | The Tunnel used for target connections. | Must reference an already-created Tunnel. | Yes, if the USP Client is behind a firewall. |
| Proxy Client | The Proxy Client to forward the connections. | Must reference an already-created Proxy Client. | Yes, if there is a Tunnel. |
| Tunnel for Other Services (LDAP, ICAP, etc.) | The Tunnel for other services communications. | Must reference an already-created Tunnel. | Yes, if the service server is behind a firewall. |
| Proxy Client for Other Services (LDAP, ICAP, etc.) | The Proxy Client that connects to the service server. | Must reference an already-created Proxy Client. | Yes, if there is a Tunnel for Other Services (LDAP, ICAP, etc.) |
Editing a Deployment
To edit a Deployment, follow these steps:
- From the Sidebar, click Configuration > Listeners.
- Click the row of the Listener's Deployment you want to edit.
- Go to the Deployments tab.
- Click the Edit button.
- Edit the Deployment using the Field Descriptions table as a guide.
The Proxy Server field cannot be edited.
- Click the Save button.
If you modify a Deployment that is currently in use by a USP Server instance, the changes will not take effect until you manually apply the updated configuration by pushing it to the server. To apply the changes:
- Navigate to Monitoring > Status.
- Click the Name of the associated USP Server instance.
- Go to the Configuration tab.
- Review the pending changes in the Updated Configuration column.
- If the changes are correct, click Push Configuration.
Deployment details include all parameters given in the Field Descriptions table above, plus the following read-only metadata:
Deployment Metadata
| Name | Description |
|---|---|
| Listener ID | The ID of the deployed Listener. |
| Created At | Date and time this Deployment was created. |
| Updated At | Date and time this Deployment was last updated. |
Deleting a Deployment
To delete a Deployment, follow these steps:
- From the Sidebar, click Configuration > Listeners.
- Click the row of the Listener's Deployment you want to delete.
- Go to the Deployments tab.
- Click the row of the Deployment you want to delete.
- Click the Delete button above the Deployment details.
- You will be asked to confirm the deletion. Click Delete.
USP Manager prevents deletion of a Deployment if it is currently referenced by another Configuration Item.
Additionally, if the Deployment is used by a USP Server instance, the updated configuration must be manually applied. To apply the changes:
- Navigate to Monitoring > Status.
- Click the Name of the associated USP Server instance.
- Go to the Configuration tab.
- Review the pending changes in the Candidate Configuration - Preview section.
- If the changes are correct, click Push Configuration.
The changes do not take effect on the server until this step is completed.
Managing a Deployment
Managing a Deployment involves stopping and starting its Listener:
- If a Listener is running, it handles incoming connections on that port.
- If a Listener is stopped, the external incoming connection is refused.
To stop or add a Listener, follow these steps:
- Navigate to Monitoring > Status.
- Click the row of the associated server.
- Go to the Live Listeners tab.
- Click the [ ··· ] button.
- Click the Stop Listener or Start Listener button.
See Live Listeners Tab for more information.