Inbound Nodes
An Inbound Node defines the virtual server that handles incoming partner connections. It includes several key settings that control how connections are matched, authenticated, and secured:
- The priority and address filter determine how USP Server selects the appropriate node for an incoming connection.
- The associated Rule specifies the authentication policies applied to the connection.
- The assigned Certificates or Keys establish the identity of the server and the partner during TLS or SSH handshakes.
- The Advanced Configuration options allow customization of cryptographic parameters, supported cipher suites, and other protocol-level security controls.
Before You Begin
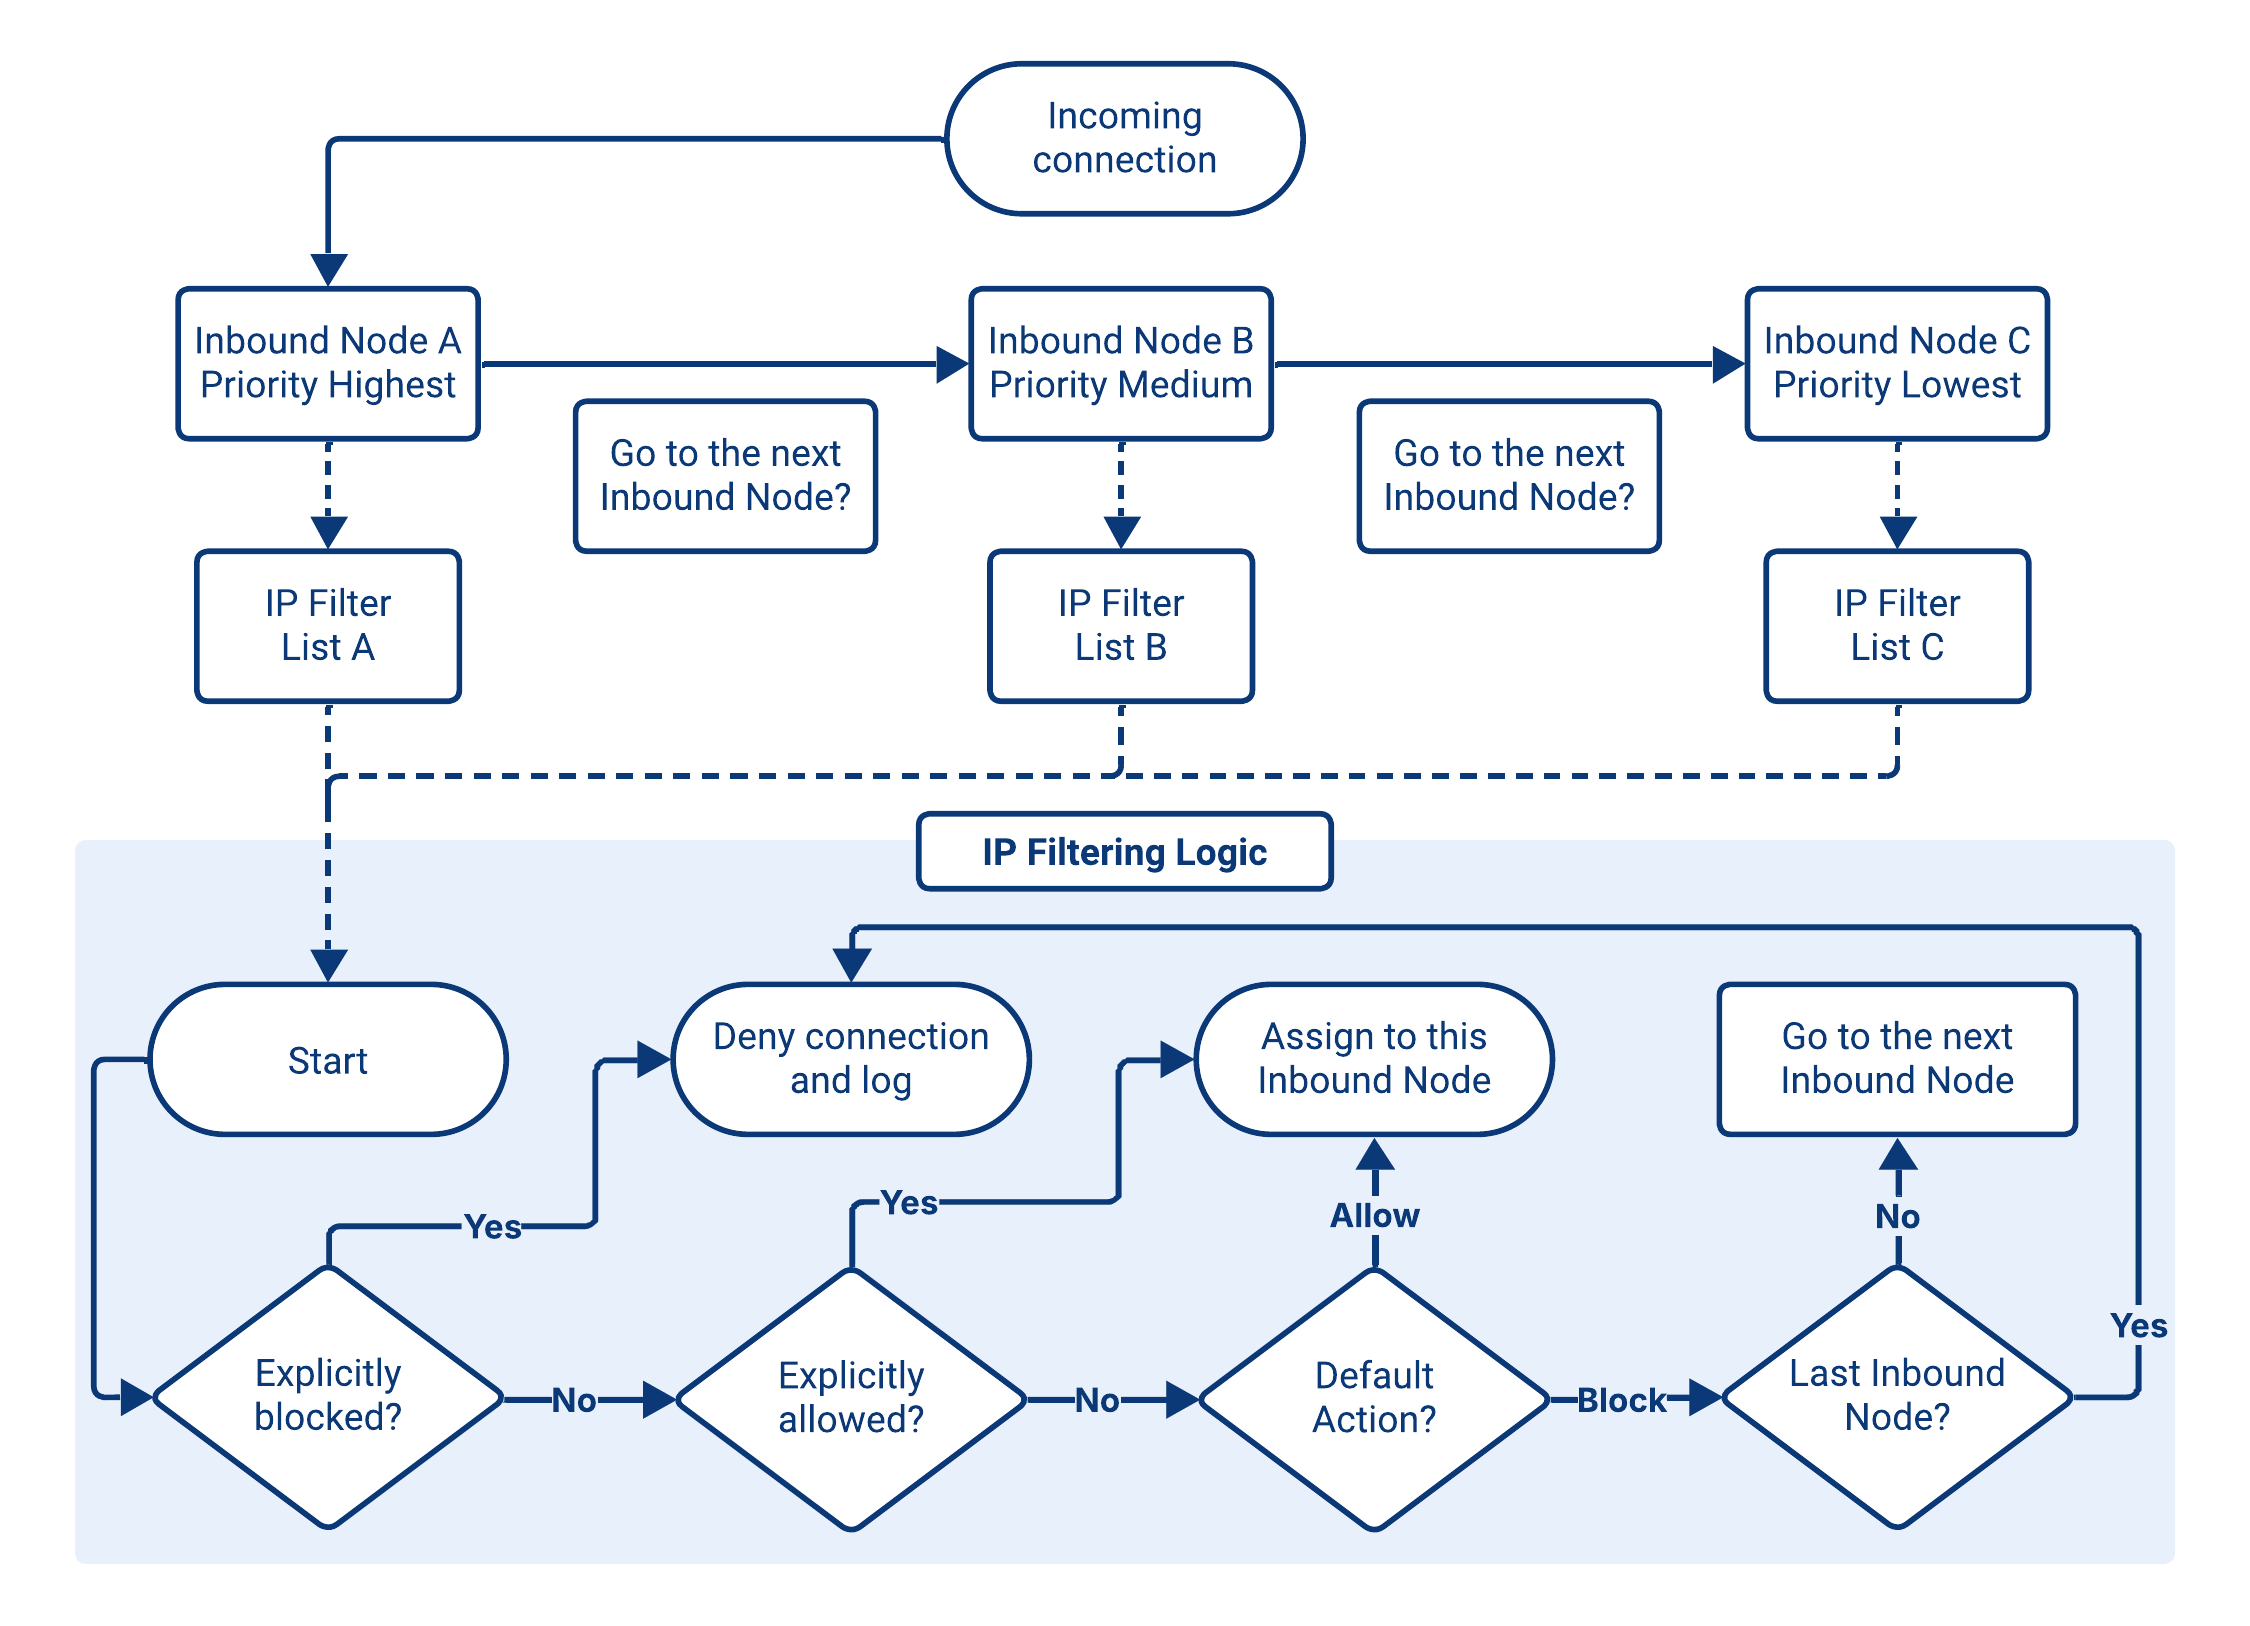
Priority and IP Address Filter
When an inbound connection is received, USP Server performs the following matching process:
- Sort by Priority: All Inbound Nodes that belong to the Route are ordered by Priority, highest to lowest.
- Evaluate each Inbound Node: The connection's source IP is checked against the Node's assigned IP Address Filter List.
- Select the first match: The first Inbound Node that matches the connection is used. If no Inbound Nodes match, the connection is rejected.
Unlike USP Admin UI IP Filtering, Inbound Nodes must always reference an IP Filter and may reference an empty one.
The effect of an empty IP Filter depends on its Default Action:
- If it is Block, all connections are denied. This can be used intentionally to shut down access to an Inbound Node.
- If it is Allow, all connections are permitted, effectively disabling IP-based restrictions for that node.
For more information on empty IP Filters use cases, refer to the Empty Filters.
Advanced Flow
When a Route contains multiple Inbound Nodes, the evaluation flow becomes more complex, as the USP Server must account for both node Priority and each Node's assigned IP Filter.
Connections are always processed in descending Priority order, and the first node whose filter criteria are satisfied determines the outcome. The following example (and diagram) illustrates how different source IPs are evaluated across three Inbound Nodes.
Example
Consider a Route with three Inbound Nodes:
| Inbound Node | Priority | IP Filter (Block Rule) | IP Filter (Allow Rule) | IP Filter (Default Action) |
|---|---|---|---|---|
| Node A | 100 (highest) | 10.0.0.5 | 10.0.0.0/24 | Block |
| Node B | 50 | 172.16.1.1 | 172.16.0.0/16 | Block |
| Node C | 10 (lowest) | 192.168.1.42 | 192.168.1.0/24 | Block |
Evaluation follows the Priority and IP Address Filter rules: highest Priority first, Block before Allow, stop at the first match.
| Source IP | Node A | Node B | Node C | Result |
|---|---|---|---|---|
10.0.0.25 |
| Accepted by Node A | ||
172.16.1.2 |
|
| Accepted by Node B | |
10.0.0.5 |
|
|
| Rejected |
USP and Partner Verification Credentials
- FTP(S)
- HTTP(S)
- SFTP
The TLS Certificate and CA Certificate fields control whether TLS is used and, when enabled, how the USP Server authenticates itself and (optionally) validates partner certificates during the TLS handshake.
| TLS Certificate | CA Certificate | Resulting Behavior |
|---|---|---|
| Connection uses plain FTP with no TLS encryption. | ||
| USP establishes a standard one-way TLS connection. The USP Server is authenticated, but partner certificates are not requested nor validated. | ||
| USP enforces mutual TLS (mTLS). Both the USP Server and the partner present and validate certificates during the TLS handshake. | ||
| Invalid configuration. A CA Certificate cannot be used without a TLS Certificate; USP returns a configuration error. |
The TLS Certificate and CA Certificate fields control whether TLS is used and, when enabled, how the USP Server authenticates itself and (optionally) validates partner certificates during the TLS handshake.
| TLS Certificate | CA Certificate | Resulting Behavior |
|---|---|---|
| Connection uses plain HTTP with no TLS encryption. | ||
| USP establishes a standard one-way TLS connection. The USP Server is authenticated, but partner certificates are not requested nor validated. | ||
| USP enforces mutual TLS (mTLS). Both the USP Server and the partner present and validate certificates during the TLS handshake. | ||
| Invalid configuration. A CA Certificate cannot be used without a TLS Certificate; USP returns a configuration error. |
The Host Private Key defines the SSH host identity of the virtual server that partners connect to. When a partner initiates an SFTP session, the USP Server presents this key during the SSH handshake to prove its identity.
This field is mandatory because the SSH protocol cannot proceed without a host identity. Only one private key is used per Inbound Node, and it must reference an already created Private Key.
Partner Authentication Credentials
Regardless of the protocol used, the credentials required from the partner to authenticate to USP depend on the Inbound Authentication Method defined in the associated Rule.
Advanced Configuration
Optional parameters can be configured under the Advanced section. These settings provide fine-grained control over protocol behavior for inbound connections, allowing alignment with internal security policies and compliance requirements.
These settings are optional but recommended when stricter protocol-level security controls are required.
- FTPS
- HTTPS
- SFTP
Advanced FTPS settings define the cryptographic parameters supported by the USP Server during TLS negotiation. These options allow administrators to align the system with internal security policies and compliance requirements.
- TLS Version Override: Restricts the minimum and maximum TLS protocol versions accepted. By default, USP uses the most secure versions available (TLS 1.2 and TLS 1.3).
- Curve Preferences Override: Defines which elliptic-curve algorithms are allowed for ECDHE key exchange. By default, USP enables all available curves.
- Cipher Overrides: Specifies which cipher suites the USP Server advertises during the TLS handshake. Incompatible ciphers are ignored automatically. By default, USP uses ciphers supported by the selected TLS version.
Default Ciphers
When no Cipher Overrides are selected, by default USP uses the secure ciphers supported by each version:
| TLS Version | Default Cipher Suites |
|---|---|
| TLS 1.3 |
|
| TLS 1.0-1.2 |
|
| TLS 1.2 only |
|
Available Ciphers
| Cipher Suite | Secure | Reason |
|---|---|---|
TLS_RSA_WITH_RC4_128_SHA | Uses RC4 (insecure stream cipher) and RSA key exchange (no forward secrecy). | |
TLS_RSA_WITH_3DES_EDE_CBC_SHA | Uses 3DES (obsolete, weak) and RSA key exchange (no forward secrecy). | |
TLS_RSA_WITH_AES_128_CBC_SHA | Uses RSA key exchange (no forward secrecy). | |
TLS_RSA_WITH_AES_256_CBC_SHA | Uses RSA key exchange (no forward secrecy). | |
TLS_RSA_WITH_AES_128_CBC_SHA256 | RSA key exchange (no forward secrecy) and no Lucky13 CBC countermeasures. | |
TLS_RSA_WITH_AES_128_GCM_SHA256 | Uses RSA key exchange (no forward secrecy), despite AEAD. | |
TLS_RSA_WITH_AES_256_GCM_SHA384 | Uses RSA key exchange (no forward secrecy), despite AEAD. | |
TLS_ECDHE_ECDSA_WITH_RC4_128_SHA | Uses RC4 (insecure stream cipher). | |
TLS_ECDHE_ECDSA_WITH_AES_128_CBC_SHA | ECDHE + ECDSA provides forward secrecy; AES-128-CBC is acceptable here. | |
TLS_ECDHE_ECDSA_WITH_AES_256_CBC_SHA | ECDHE + ECDSA provides forward secrecy; AES-256-CBC is acceptable here. | |
TLS_ECDHE_RSA_WITH_RC4_128_SHA | Uses RC4 (insecure stream cipher). | |
TLS_ECDHE_RSA_WITH_3DES_EDE_CBC_SHA | Uses 3DES (obsolete, weak). | |
TLS_ECDHE_RSA_WITH_AES_128_CBC_SHA | ECDHE + RSA provides forward secrecy; AES-128-CBC is acceptable here. | |
TLS_ECDHE_RSA_WITH_AES_256_CBC_SHA | ECDHE + RSA provides forward secrecy; AES-256-CBC is acceptable here. | |
TLS_ECDHE_ECDSA_WITH_AES_128_CBC_SHA256 | Lacks Lucky13 mitigations for CBC-mode AES. | |
TLS_ECDHE_RSA_WITH_AES_128_CBC_SHA256 | Lacks Lucky13 mitigations for CBC-mode AES. | |
TLS_ECDHE_RSA_WITH_AES_128_GCM_SHA256 | AEAD cipher (AES-GCM) plus ECDHE forward secrecy. | |
TLS_ECDHE_ECDSA_WITH_AES_128_GCM_SHA256 | AEAD cipher (AES-GCM) plus ECDHE forward secrecy. | |
TLS_ECDHE_RSA_WITH_AES_256_GCM_SHA384 | AEAD cipher (AES-GCM) plus ECDHE forward secrecy. | |
TLS_ECDHE_ECDSA_WITH_AES_256_GCM_SHA384 | AEAD cipher (AES-GCM) plus ECDHE forward secrecy. | |
TLS_ECDHE_RSA_WITH_CHACHA20_POLY1305_SHA256 | AEAD cipher (ChaCha20-Poly1305) plus ECDHE forward secrecy. | |
TLS_ECDHE_ECDSA_WITH_CHACHA20_POLY1305_SHA256 | AEAD cipher (ChaCha20-Poly1305) plus ECDHE forward secrecy. |
Advanced HTTPS settings define the cryptographic parameters supported by the USP Server during TLS negotiation. These options allow administrators to align the system with internal security policies and compliance requirements.
- TLS Version Override: Restricts the minimum and maximum TLS protocol versions accepted. By default, USP uses the most secure versions available (TLS 1.2 and TLS 1.3).
- Curve Preferences Override: Defines which elliptic-curve algorithms are allowed for ECDHE key exchange. By default, USP enables all available curves.
- Cipher Overrides: Specifies which cipher suites the USP Server advertises during the TLS handshake. Incompatible ciphers are ignored automatically. By default, USP uses ciphers supported by the selected TLS version.
Default Ciphers
When no Cipher Overrides are selected, by default USP uses the secure ciphers supported by each version:
| TLS Version | Default Cipher Suites |
|---|---|
| TLS 1.3 |
|
| TLS 1.0-1.2 |
|
| TLS 1.2 only |
|
Available Ciphers
| Cipher Suite | Secure | Reason |
|---|---|---|
TLS_RSA_WITH_RC4_128_SHA | Uses RC4 (insecure stream cipher) and RSA key exchange (no forward secrecy). | |
TLS_RSA_WITH_3DES_EDE_CBC_SHA | Uses 3DES (obsolete, weak) and RSA key exchange (no forward secrecy). | |
TLS_RSA_WITH_AES_128_CBC_SHA | Uses RSA key exchange (no forward secrecy). | |
TLS_RSA_WITH_AES_256_CBC_SHA | Uses RSA key exchange (no forward secrecy). | |
TLS_RSA_WITH_AES_128_CBC_SHA256 | RSA key exchange (no forward secrecy) and no Lucky13 CBC countermeasures. | |
TLS_RSA_WITH_AES_128_GCM_SHA256 | Uses RSA key exchange (no forward secrecy), despite AEAD. | |
TLS_RSA_WITH_AES_256_GCM_SHA384 | Uses RSA key exchange (no forward secrecy), despite AEAD. | |
TLS_ECDHE_ECDSA_WITH_RC4_128_SHA | Uses RC4 (insecure stream cipher). | |
TLS_ECDHE_ECDSA_WITH_AES_128_CBC_SHA | ECDHE + ECDSA provides forward secrecy; AES-128-CBC is acceptable here. | |
TLS_ECDHE_ECDSA_WITH_AES_256_CBC_SHA | ECDHE + ECDSA provides forward secrecy; AES-256-CBC is acceptable here. | |
TLS_ECDHE_RSA_WITH_RC4_128_SHA | Uses RC4 (insecure stream cipher). | |
TLS_ECDHE_RSA_WITH_3DES_EDE_CBC_SHA | Uses 3DES (obsolete, weak). | |
TLS_ECDHE_RSA_WITH_AES_128_CBC_SHA | ECDHE + RSA provides forward secrecy; AES-128-CBC is acceptable here. | |
TLS_ECDHE_RSA_WITH_AES_256_CBC_SHA | ECDHE + RSA provides forward secrecy; AES-256-CBC is acceptable here. | |
TLS_ECDHE_ECDSA_WITH_AES_128_CBC_SHA256 | Lacks Lucky13 mitigations for CBC-mode AES. | |
TLS_ECDHE_RSA_WITH_AES_128_CBC_SHA256 | Lacks Lucky13 mitigations for CBC-mode AES. | |
TLS_ECDHE_RSA_WITH_AES_128_GCM_SHA256 | AEAD cipher (AES-GCM) plus ECDHE forward secrecy. | |
TLS_ECDHE_ECDSA_WITH_AES_128_GCM_SHA256 | AEAD cipher (AES-GCM) plus ECDHE forward secrecy. | |
TLS_ECDHE_RSA_WITH_AES_256_GCM_SHA384 | AEAD cipher (AES-GCM) plus ECDHE forward secrecy. | |
TLS_ECDHE_ECDSA_WITH_AES_256_GCM_SHA384 | AEAD cipher (AES-GCM) plus ECDHE forward secrecy. | |
TLS_ECDHE_RSA_WITH_CHACHA20_POLY1305_SHA256 | AEAD cipher (ChaCha20-Poly1305) plus ECDHE forward secrecy. | |
TLS_ECDHE_ECDSA_WITH_CHACHA20_POLY1305_SHA256 | AEAD cipher (ChaCha20-Poly1305) plus ECDHE forward secrecy. |
Advanced SFTP settings allow customization of the SSH server's behavior and supported cryptographic parameters.
- Server Version: The version string advertised during the SSH handshake.
- Banner: Optional message sent to the client after key exchange but before authentication. Often used for policy or legal notices.
- Key Exchange Algorithms: The Diffie-Hellman or elliptic-curve algorithms allowed during key exchange. Limiting these strengthens session-establishment security.
- Ciphers: The symmetric encryption algorithms available for SSH traffic. Administrators can restrict weaker options to enforce compliance requirements (for example, FIPS).
- MACs: Message Authentication Code algorithms that protect data integrity. Selecting stronger SHA-2-based variants improves resistance against tampering.
Inbound Nodes Administration
Adding an Inbound Node
To add an Inbound Node, follow these steps:
- From the Sidebar, click Configuration > Routes.
- Click the row of the Route where you want to add the Inbound Node.
- Go to the Inbound Nodes tab.
- Click Add Inbound Node.
- Complete the Inbound Node details using the Field Descriptions table as a guide.
- Click Save.
Field Descriptions
- FTP(S)
- HTTP(S)
- SFTP
| Name | Description | Specifications | Required |
|---|---|---|---|
| Name | The name of the Inbound Node. | Must be unique. | Yes |
| Description | The description of the Inbound Node. | No | |
| IP Address Filter List | The name of the IP Filter that an incoming connection must surpass to be accepted. | Must reference an already-created IP Filter. | Yes |
| Priority Number | An integer that defines the priority of the Inbound Node. Nodes with higher values are evaluated first when matching inbound connections. | Must be within 1 and 100000. | Yes |
| Rule | The Rule associated with the node, which defines the authentication behavior for external incoming connections. | Must reference an already-created Rule. | Yes |
| Passive IP Address | The public IP address returned to the client along with the PASV port address. | This IP must be reachable by the client (typically your load balancer IP). | Yes |
| Passive Port Start Range | The lowest TCP port value that the server can use for passive (PASV) data connections. |
| Yes |
| Passive Port End Range | The highest TCP port value that the server can use for passive (PASV) data connections. |
| Yes |
| Banner | An optional welcome banner that is displayed to FTP clients. | No | |
| Encryption Mode | The encryption mode that will be used. Options (multi-select):
| Yes | |
| TLS Certificate | The TLS certificate presented by the USP Server during the TLS handshake. | Must reference an already-created TLS Certificate. | Yes, if Encryption Mode is Implicit (FTPS) or Explicit (FTPES). |
| CA Certificate | The CA certificate used to validate client certificates during mTLS authentication. | Must reference an already-created CA Certificate. | No |
| TLS Version Override | USP automatically uses the most secure TLS version available (1.2 or 1.3). To specify a version, set two versions (smallest is minimum, highest is maximum). Options (multi-select):
| No | |
| Curve Preferences Override | USP uses all available curve preferences by default unless you specify otherwise. Options (multi-select):
| No | |
| Cipher Overrides | Available ciphers depend on the selected TLS version. Select the ciphers you want to use. Options (multi-select), see Available Ciphers. | USP will ignore any ciphers incompatible with your TLS version. See Default Ciphers. | No |
| Name | Description | Specifications | Required |
|---|---|---|---|
| Name | The name of the Inbound Node. | Must be unique. | Yes |
| Description | The description of the Inbound Node. | No | |
| IP Address Filter List | The name of the IP Filter that an incoming connection must surpass to be accepted. | Must reference an already-created IP Filter. | Yes |
| Priority Number | An integer that defines the priority of the Inbound Node. Nodes with higher values are evaluated first when matching inbound connections. | Must be within 1 and 100000. | Yes |
| Rule | The Rule associated with the node, which defines the authentication behavior for external incoming connections. | Must reference an already-created Rule. | Yes |
| TLS Certificate | A TLS certificate presented by the USP Server during the optional TLS handshake. Options:
| Must reference an already-created TLS Certificate. | No |
| CA Certificate | The CA certificate used to validate client certificates during the optional mTLS authentication. Options:
| Must reference an already-created CA Certificate. | No |
| TLS Version Override | USP automatically uses the most secure TLS version available (1.2 or 1.3). To specify a version, set two versions (smallest is minimum, highest is maximum). Options (multi-select):
| No | |
| Curve Preferences Override | USP uses all available curve preferences by default unless you specify otherwise. Options (multi-select):
| No | |
| Cipher Overrides | Available ciphers depend on the selected TLS version. Select the ciphers you want to use. Options (multi-select), see Available Ciphers. | USP will ignore any ciphers incompatible with your TLS version. See Default Ciphers. | No |
| Name | Description | Specifications | Required |
|---|---|---|---|
| Name | The name of the Inbound Node. | Must be unique. | Yes |
| Description | The description of the Inbound Node. | No | |
| IP Address Filter List | The name of the IP Filter that an incoming connection must surpass to be accepted. | Must reference an already-created IP Filter. | Yes |
| Priority Number | An integer that defines the priority of the Inbound Node. Nodes with higher values are evaluated first when matching inbound connections. | Must be within 1 and 100000. | Yes |
| Rule | The Rule associated with the node, which defines the authentication behavior for external incoming connections. | Must reference an already-created Rule. | Yes |
| Host Private Key | The name of the Private Key used as the virtual server's host key. | Must reference an already-created Private Key. | Yes |
| SSH Software Version Identifier | The version identification string that is announced during the SSH public handshake. | Default value: SSH-2.0-USP. | Yes |
| Banner | A string that, if present, is sent to the Client after the SSH Key Exchange is completed, but before authentication. | No | |
| Key Exchange Algorithms | The allowed key exchange algorithms. Options (multi-select):
| No | |
| Ciphers | The allowed cipher algorithms. Options (multi-select):
| No | |
| MACs | The allowed MAC algorithms. Options (multi-select):
| No |
Editing an Inbound Node
To edit an Inbound Node, follow these steps:
- From the Sidebar, click Configuration > Routes.
- Click the row of the Route where the Inbound Node is added.
- Go to the Inbound Nodes tab.
- Click the row of the Inbound Node you want to edit.
- Click the Edit button above the Inbound Nodes details.
- Edit the Inbound Node details using the Field Descriptions table as a guide.
- Click Save.
If you modify a Inbound Node that is currently in use by a USP Server instance, the changes will not take effect until you manually apply the updated configuration by pushing it to the server. To apply the changes:
- Navigate to Monitoring > Status.
- Click the Name of the associated USP Server instance.
- Go to the Configuration tab.
- Review the pending changes in the Updated Configuration column.
- If the changes are correct, click Push Configuration.
Inbound Node Metadata
Inbound Nodes details include all parameters given in the Field Descriptions table above, plus the following read-only metadata:
| Name | Description |
|---|---|
| ID | Universally Unique Identifier of this Inbound Node. |
| Route ID | The ID of the Route where the node belongs. |
| Created At | Date and time this Inbound Node was created. |
| Updated At | Date and time this Inbound Node was last updated. |
Deleting an Inbound Node
To delete an Inbound Node, follow these steps:
- From the Sidebar, click Configuration > Routes.
- Click the row of the Route where the Inbound Node is added.
- Go to the Inbound Nodes tab.
- Click the row of the Inbound Node you want to delete.
- Click Delete.
- You will be asked to confirm the deletion. Click Delete.
If the Inbound Node is used by a USP Server instance, the updated configuration must be manually applied. To apply the changes:
- Navigate to Monitoring > Status.
- Click the Name of the associated USP Server instance.
- Go to the Configuration tab.
- Review the pending changes in the Candidate Configuration - Preview section.
- If the changes are correct, click Push Configuration.
The changes do not take effect on the server until this step is completed.