IP Filtering
IP Filtering controls which remote IP addresses can reach the USP Admin UI (Users) and USP Server Inbound Nodes (Accounts).
By using IP Filters, you can:
- Restrict access to the USP Admin UI so that only trusted networks can connect.
- Limit partner access per Inbound Node based on source IP address or network (CIDR range).
- Define the default posture for unmatched connections (deny or allow).
- Quickly block known-bad or temporary ranges.
- Troubleshoot decisions with the built-in Test IP tool.
Before You Begin
Where IP Filters Are Applied
IP Filtering works by creating IP Filters and assigning them to specific configurations:
- Inbound Nodes: to filter external client connections such as partner systems (Accounts).
- The Security page: to filter access to the USP Admin UI by Users.
IP Rules
Each IP Filter can have zero, one, or more IP Rules, and each IP Rule specifies:
- An IP address or canonical CIDR range (IPv4 or IPv6).
- An action:
- Allow: permits connections from the specified IPs/ranges.
- Block: explicitly denies connections from the specified IPs/ranges.
Rule Evaluation and Default Action
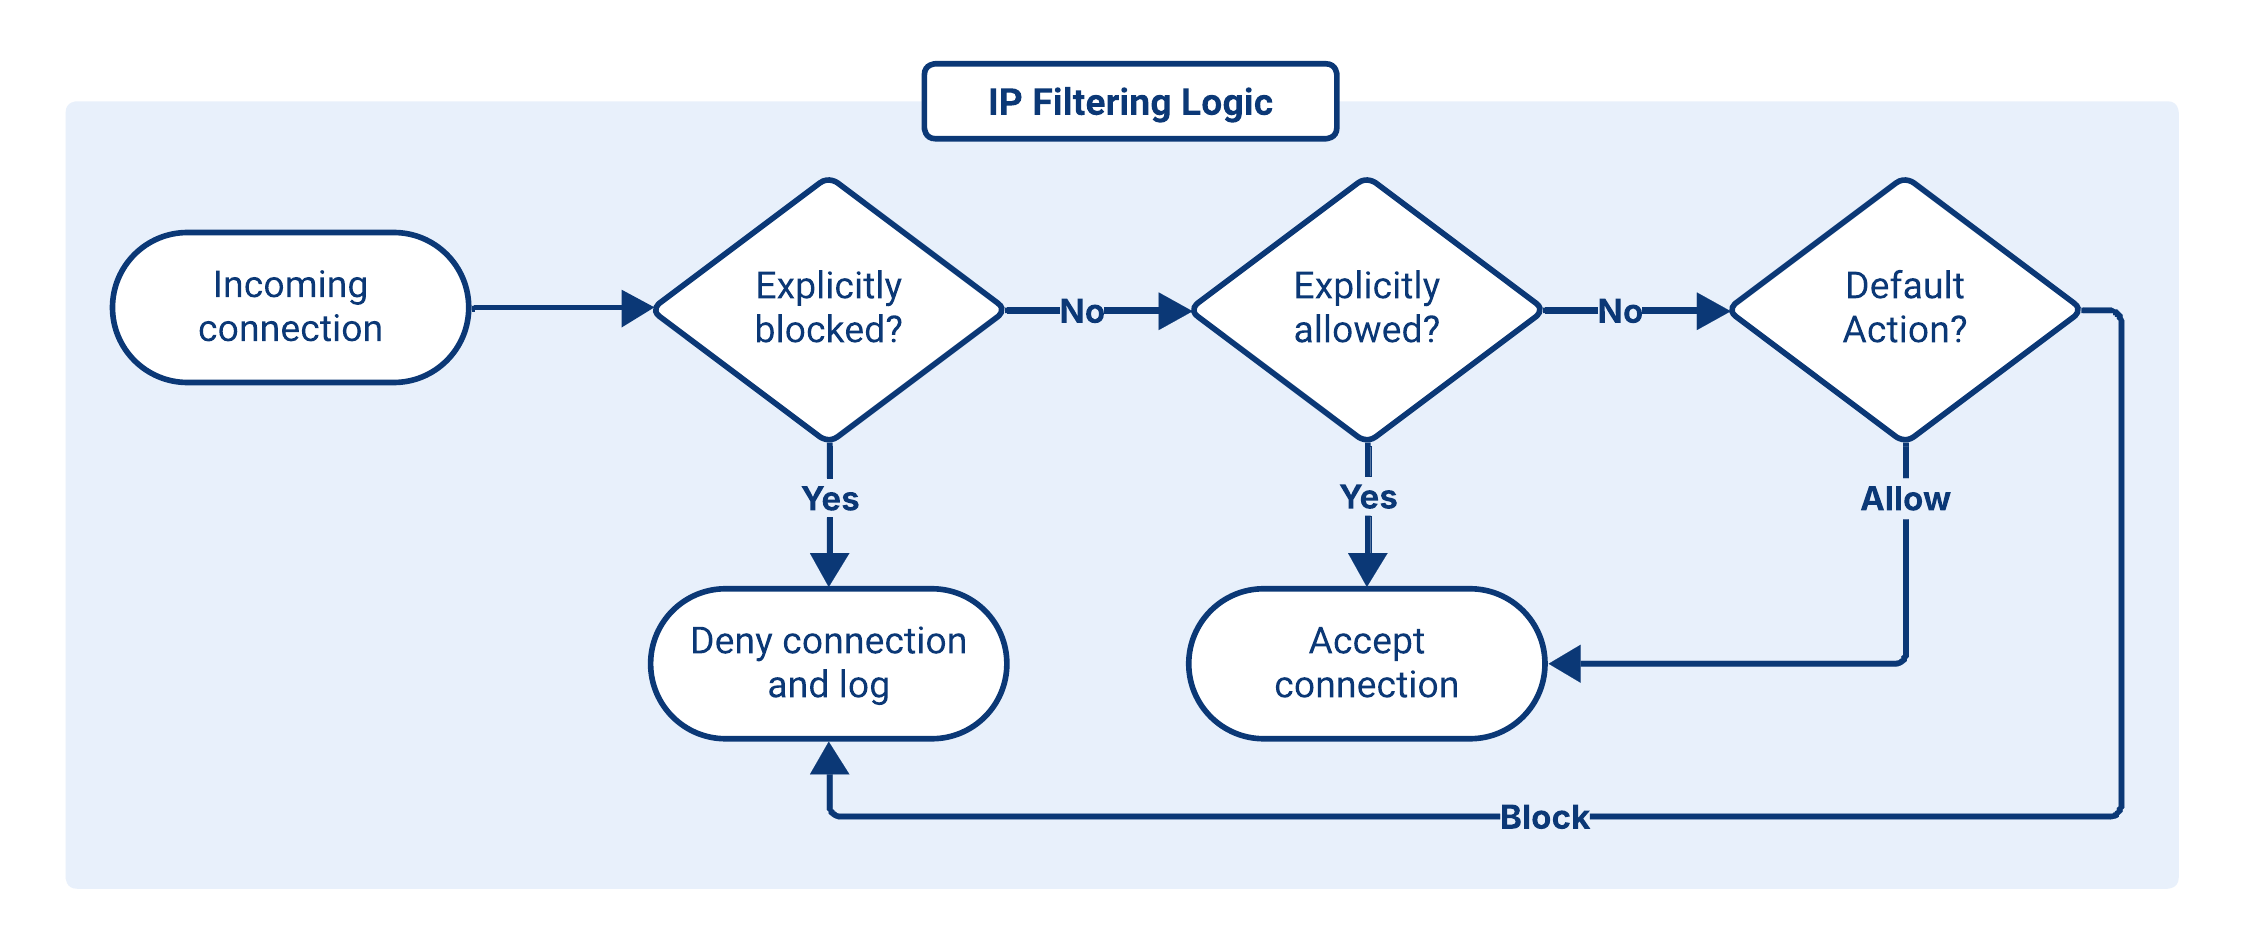
IP Filtering evaluates each incoming connection against the rules defined in the assigned IP Filter.
Rules are processed in the following order:
- Block rules are evaluated first. If the source IP matches a Block rule, the connection is immediately rejected.
- If no Block rule applies, Allow rules are checked. If the source IP matches an Allow rule, the connection is permitted.
- If the source IP does not match any rule, the configured Default Action is applied:
- Block: deny unmatched sources (recommended for security).
- Allow: permit unmatched sources.
Because of this evaluation order, Block rules always override overlapping Allow rules.
Setting the Default Action to Allow means that any IP address not explicitly covered by a rule will be permitted. This effectively turns the filter into a blocklist, where only the sources in Block rules are denied.
Empty Filters
An empty IP Filter is a filter with no Block or Allow rules defined. In this case, every incoming IP address falls through directly to the Default Action:
- If Default Action is Block, the filter effectively never matches any inbound connection (all sources are denied).
- If Default Action is Allow, the filter matches all inbound connections after priority sorting (all sources are permitted).
The second case is particularly useful when you have multiple Inbound Nodes on the same listener and want a fallback node that accepts any IP not explicitly handled by more specific filters.
For example:
- Inbound Node 1: priority
100, with an IP Filter that:- Defaults to Block.
- Contains specific Allow rules for a small set of trusted IPs.
- Inbound Node 2: priority
50, with an empty IP Filter that:- Defaults to Allow.
With this configuration:
- Connections from the trusted IPs hit Inbound Node 1 (higher priority and matching Allow rules).
- All other IPs are not allowed by Inbound Node 1's filter, so they fall back to Inbound Node 2, whose empty, default-Allow filter accepts them.
This pattern lets you apply tailored settings for a limited set of IP addresses, while still providing a more permissive, catch-all Inbound Node for the rest.
Common Filter Configurations
| Intended Result | Configuration Approach |
|---|---|
| Allow all connections |
warning Allowing all IPs effectively disables filtering. Use this only in test environments or when no IP restrictions are required. |
| Deny all connections |
info Empty IP Filters can be assigned to the USP Admin UI under specific conditions:
This check is enforced only when the filter is assigned. If the filter is edited later, it is still possible to misconfigure it and lock yourself out. See Lockout Recovery (CLI). |
| Deny a specific IP or range | Add a Block rule for the unwanted IP or range. To permit all other sources, either:
|
| Allow only a specific IP or range | Add an allow IP Rule for the desired IP or range, and set Default Action to Block. |
IP Filter Administration
Adding an IP Filter
To add an IP Filter, follow these steps:
- From the Sidebar, click Authentication > IP Filtering.
- Click Add IP Filter.
- Enter the details for the new IP Filter using the Field Descriptions table as a guide.
- Click Save.
When creating an IP Filter, only a name and a Default Action are required. You can refine its behavior later by adding IP Rules.
Field Descriptions
| Name | Description | Specifications | Required |
|---|---|---|---|
| Name | The name of the IP Filter. | Must be unique. | Yes |
| Description | The description of the IP Filter. | No | |
| Default Action | Defines the action applied when a connection's source IP does not match any rule in the IP Filter, or when the filter contains no rules. Options:
| No |
Editing an IP Filter
To edit an IP Filter, follow these steps:
- From the Sidebar, click Authentication > IP Filtering.
- Click the row of the IP Filter you want to edit.
- Click the Edit button above the IP Filter details.
- Edit the details of the IP Filter using the Field Descriptions table as a guide.
- Click Save.
If you modify an IP Filter that is currently in use by a USP Server instance, the changes will not take effect until you manually apply the updated configuration by pushing it to the server. To apply the changes:
- Navigate to Monitoring > Status.
- Click the Name of the associated USP Server instance.
- Go to the Configuration tab.
- Review the pending changes in the Updated Configuration column.
- If the changes are correct, click Push Configuration.
IP Filter Metadata
IP Filter details include all parameters given in the Field Descriptions table above, plus the following read-only metadata:
| Name | Description |
|---|---|
| ID | Universally Unique Identifier of this IP Filter. |
| Created At | Date and time this IP Filter was created. |
| Updated At | Date and time this IP Filter was last updated. |
Deleting an IP Filter
To delete an IP Filter, follow these steps:
- From the Sidebar, click Authentication > IP Filtering.
- Click the row of the IP Filter you want to delete.
- Click the Delete button above the IP Filter details.
- You will be asked to confirm the deletion. Click Delete.
USP Manager prevents deletion of an IP Filter if it is currently referenced by another Configuration Item.
Additionally, if the IP Filter is used by a USP Server instance, the updated configuration must be manually applied. To apply the changes:
- Navigate to Monitoring > Status.
- Click the Name of the associated USP Server instance.
- Go to the Configuration tab.
- Review the pending changes in the Candidate Configuration - Preview section.
- If the changes are correct, click Push Configuration.
The changes do not take effect on the server until this step is completed.
Testing an IP Filter
To test a specific IP address and see if it is allowed or blocked by an IP Filter, follow these steps:
- From the Sidebar, click Authentication > IP Filtering.
- Click the row of the IP Filter you want to test.
- Click the Test IP button above the IP Filter details.
- Complete the IP Address field with the IP you want to test.
- Click Continue.
Managing an IP Filter
Besides testing, managing an IP Filter involves three main actions: