Windows Host Installation
This guide explains how to install UDMG Server 3.3.x on Windows, configure it to connect to a supported database, start the Windows service, and verify the installation.
Prerequisites
- Administrator privileges on the Windows host where you will install UDMG Server.
- A supported database (Oracle, MySQL, Microsoft SQL Server, or PostgreSQL). For setup instructions, see Database Installation.
Before you begin, confirm that your Windows version and database version are supported, and that the host meets the hardware recommendations. For details, see System Requirements.
Installation
To install UDMG Server, follow these steps:
1. Get the Installer File
To obtain the installation package, contact your Stonebranch representative. If you do not have a representative, reach out to support@stonebranch.com.
2. Verify the Checksum
In all commands on this page, replace 3.3.x with the exact UDMG Server version you are installing.
To ensure the integrity of the downloaded package, navigate to the directory containing the installer and verify its SHA256 checksum by running the following PowerShell command:
Get-FileHash -Algorithm SHA256 .\udmg-server_3.3.x_setup.exe
For UDMG Server 3.3.x, the resulting hash must match the value provided for the installer in the corresponding checksum file:
<Hash> udmg-server_3.3.x_setup.exe
3. Run the Installer
Run the UDMG Server installer and follow the prompts in the installation wizard to complete the installation.
You can select a custom installation path or accept the default.
For this guide, we use the default path: C:\Program Files\Stonebranch\UDMG Server\.
Do not select the Start UDMG Server Service now checkbox, as you still need to configure the Configuration File before the service can run.
4. Check the Installed Binary
After installation, the binaries and configuration files are located in the installation folder.
You can verify that the binary is installed by running:
CMD command:
"C:\Program Files\Stonebranch\UDMG Server\udmg-server.exe" --version
Example output:
udmg-server version 3.3.x-b5685:97ef93098f83e747e064691af7acd2a1f0ac19a5:HEAD:2026-02-02T14:12:19Z
The exact version and build information may differ.
Configuration
All HCL arguments described on this page use dot notation to reference their full path from the root of the configuration file.
After installing the software, the next step is to configure UDMG Server by editing the Configuration File. By default, the Configuration File is located at C:\Program Files\Stonebranch\UDMG Server\udmg-server.hcl.
The initial Configuration File includes baseline configuration values. However, certain arguments (such as the database connection, working directory, and security keys) must be configured before the instance can start successfully.
To configure UDMG Server (including recommended security settings), edit the Configuration File as follows:
1. Work Directory Path
Configure the work_directory_path argument to set the root working directory for UDMG Server.
For example:
work_directory_path = "C:\\UDMG\\WorkDir\\"
For more context and recommendations, see Work Directory Path.
2. jwt Block
Configure the jwt block to set the signing key used to sign access and refresh tokens for the UDMG Admin UI, UDMG REST API, and WTC UI. This key must be a strong secret of at least 30 characters and can contain only letters, numbers, and underscores.
jwt {
  signing_key = "<REPLACE_WITH_YOUR_LONG_RANDOM_KEY>"

  ...

}
3. database Block
You can configure the database block in two ways: by specifying individual connection parameters, or by using a TNS-format DSN (Oracle only).
- Individual Parameters (Any Engine)
- DSN in TNS Format (Oracle)
For any supported database engine, you can configure the database block using individual parameters such as database.hostname, database.port, and database.name.
In this example, we followed the Database Installation guide for MySQL and have a MySQL database running on the same host as UDMG Server, with the default MySQL port:
database {
  engine   = "mysql"
  name     = "udmg"
  hostname = "localhost"
  port     = 3306
  user     = "udmgadm"
  password = "udmg-mysql-password"

  ...
}
For Oracle databases, you can also configure the database block using a DSN, instead of individual arguments. For this, UDMG supports TNS descriptors as a single-line string.
In this case, you must still specify database.user and database.password separately:
database {
  engine   = "oracle"
  user     = "udmgadm"
  password = "udmg-oracle-password"
  dsn = "(DESCRIPTION=(ADDRESS=(PROTOCOL=TCP)(HOST=hostname)(PORT=1521))(CONNECT_DATA=(SERVICE_NAME=service_name)))"

  ...
}
When using the TNS descriptor format:
- The
database.useranddatabase.passwordfields are required. - When
database.dsnis set, it overridesdatabase.hostname,database.port, anddatabase.name.
4. database.secure Block (Optional)
Use the database.secure block to configure optional TLS/SSL for the database connection.
To enable TLS/SSL, set database.secure.enable to true and adjust the database.secure.mode according to your database security requirements.
If your database requires client certificate authentication, provide the paths to the client certificate and private key files.
database {

  secure {
    enable   = true
    mode     = "require"
    pub_key  = "C:\\Program Files\\Stonebranch\\UDMG Server\\certs\\db-client-cert.pem"
    priv_key = "C:\\Program Files\\Stonebranch\\UDMG Server\\certs\\db-client-key.pem"
  }

  ...
}
5. security Block
Set the security.passphrase_key field to define the root encryption key used to protect secret values (passwords, credential private keys, etc.).
This key:
- Must be a valid 32-byte (64-character) hexadecimal string.
- Must be kept secret and backed up securely (it is required for decryption and disaster recovery).
You can generate a suitable value using one of the following methods:
- PowerShell (Get-Random)
- PowerShell (RandomNumberGenerator)
Generate a 64-character hexadecimal string (basic method):
$UDMG_SECURITY_PASSPHRASE_KEY = (1..64 | ForEach-Object { '{0:X}' -f (Get-Random -Max 16) }) -join ''
$UDMG_SECURITY_PASSPHRASE_KEY
Generate a 64-character hexadecimal string using cryptographically secure randomness:
$UDMG_SECURITY_PASSPHRASE_KEY = & {
$bytes = [byte[]]::new(32)
[Security.Cryptography.RandomNumberGenerator]::Create().GetBytes($bytes)
try {
    ([BitConverter]::ToString($bytes) -replace '-', '').ToLowerInvariant()
}
finally {
    [Array]::Clear($bytes, 0, $bytes.Length)
}
}
$UDMG_SECURITY_PASSPHRASE_KEY
Then set it in the Configuration File:
security {
  passphrase_key = "<REPLACE_WITH_YOUR_64_CHARACTER_HEXADECIMAL_STRING>"

  ...
}
For production environments, we strongly recommend providing the passphrase key via the UDMG_SECURITY_PASSPHRASE_KEY environment variable using Custom Functions.
See Encryption Key Rotation for instructions on how to rotate this key securely.
6. api Block
Use the api block to configure how the UDMG Server API listens for incoming connections.
api.inetcontrols the bind address (default is0.0.0.0, which listens on all interfaces).api.portsets the TCP port for the API (default is"8080").api.trusted_domainsdefines the allowed origins for the UDMG Admin UI when it is served from an external web server.
For example:
api {
    inet = "0.0.0.0"
    port = "8080"
    trusted_domains = [
      "udmg.my-company.com",
      "udmg-staging.my-company.com:9180",
    ]

    ...
}
If you are upgrading from UDMG 3.2.0 or UDMG 3.2.1, you must also remove the api.allow_concurrent_user_login argument from the Configuration File.
This argument is no longer supported in the Configuration File. Starting with UDMG 3.3.0, concurrent administrative sessions are controlled by the Maximum Concurrent User Sessions setting.
7. api.secure Block (Recommended)
Use the api.secure block to enable HTTPS and configure the TLS certificate and key used by the UDMG REST API.
While optional, enabling HTTPS is highly recommended to secure client communication with the UDMG REST API, especially in production environments or when the server is exposed beyond localhost.
When api.secure.enable is set to true, the UDMG REST API listens over HTTPS on the configured api.port using the provided certificate and key.
To enable HTTPS, set api.secure.enable to true and provide the paths to your certificate (api.secure.pub_key) and private key (api.secure.priv_key):
For example:
api {
  ...

  secure {
    enable   = true
    pub_key  = "C:\\Program Files\\Stonebranch\\UDMG Server\\certs\\udmg-api-cert.pem"
    priv_key = "C:\\Program Files\\Stonebranch\\UDMG Server\\certs\\udmg-api-key.pem"
  }
}
For details on the PEM certificate and key files, see the api block.
8. log Block
Use the log block to configure the logging behavior of UDMG Server. In particular, set log.file to a valid file path to enable file-based logging during installation and configuration.
For example:
log {
  file = "C:\\Program Files\\Stonebranch\\UDMG Server\\logs\\udmg-server.log"

  ...
}
Service Start
Once the configuration is complete, start the UDMG Server service by running the following PowerShell command:
Start-Service -Name "udmg-server"
Optionally, set the service to start automatically with the system using the following PowerShell command:
Set-Service -Name "udmg-server" -StartupType Automatic
Installation Verification
1. Verify That the Service Started Correctly
To confirm that the Windows service is installed and running, run the following PowerShell command:
Get-Service -Name "udmg-server"
Expected output:
Status   Name         DisplayName
------   ----         -----------
Running  udmg-server  Stonebranch UDMG Server
2. Verify Listening Ports
Verify that UDMG Server is listening on the expected ports by running the following PowerShell command:
Get-NetTCPConnection -State Listen |
  Where-Object { $_.OwningProcess -eq (Get-Process -Name "udmg-server").Id } |
  Select-Object LocalAddress, LocalPort, OwningProcess |
  Sort-Object LocalPort
Example output:
LocalAddress LocalPort OwningProcess
------------ --------- -------------
::                4222          2192
::                6222          2192
::                7070          2192
::                8080          2192
3. Test UDMG REST API
Test the UDMG REST API by running:
curl.exe https://localhost:8080/auth/login/_csrf
If you are using a self-signed certificate for testing purposes, you may need to ignore certificate validation errors using the -k flag:
curl.exe -k https://localhost:8080/auth/login/_csrf
Example output:
{"csrfToken":"e07df0cd-dabe-43dc-93cd-8a2fd4582e52"}
The previous command assumes that you enabled HTTPS for the UDMG REST API. If you did not enable HTTPS, replace https with http and adjust the port if necessary.
4. Test UDMG Observability API
Test the UDMG Observability API by running the following PowerShell command:
(Invoke-WebRequest -Uri "http://localhost:7070/_/ping").Content
Example output:
ACTIVE
To enable HTTPS for the Observability API, configure the observability.api.secure block in the Configuration File.
5. Verify the UDMG Admin UI Endpoint
Test the UDMG Admin UI web server by running:
curl.exe https://localhost:8080/ui/ | findstr /R "<title>.*</title>"
If you are using a self-signed certificate for testing purposes, you may need to ignore certificate validation errors using the -ks flag:
curl.exe -ks https://localhost:8080/ui/ | findstr /R "<title>.*</title>"
Expected output:
<title>Stonebranch Universal Data Mover Gateway</title>
6. Open the UDMG Admin UI in a Browser
Use a web browser to navigate to:
http://localhost:8080/ui/, orhttps://localhost:8080/ui/(if HTTPS is enabled as recommended).
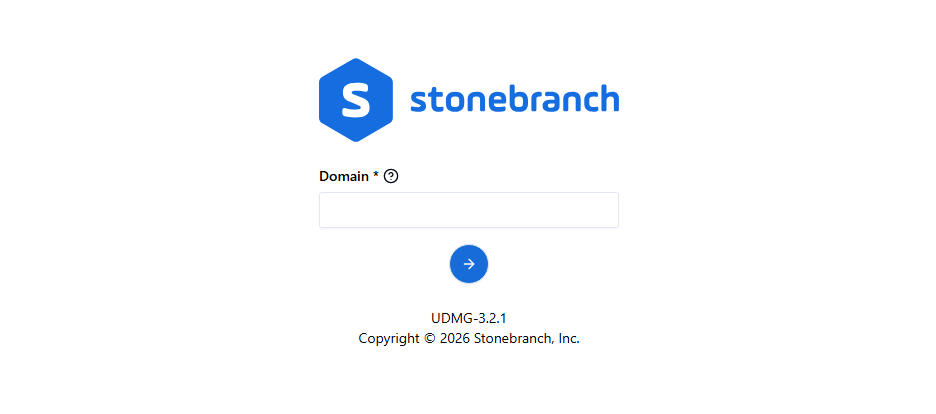
The following screenshot shows a successful login page load:
For detailed guidance on navigating and using the Admin UI, see the Admin UI Interface section.
Default Port Numbers
| Default Port | Description | Configuration File Argument |
|---|---|---|
8080 | UDMG Server API Port | api.port |
7070 | UDMG Server Observability API Port | observability.api.port |
4222 | UDMG Server Cluster Client Port | cluster.client_port |
6222 | UDMG Server Cluster Server Port | cluster.cluster_port |