Remote Cloud Storage to Local Filesystem
The Remote Cloud Storage to Local Filesystem Pipeline enables UDMG to pull files from a cloud storage provider to the local UDMG filesystem.
This Pipeline consists of:
- A Remote Cloud Storage Endpoint that represents the cloud storage location from which files are read (used as the Source Endpoint).
- A Local Filesystem Endpoint that represents the location on the UDMG host where the files are written (used as the Destination Endpoint).
- Pipeline-specific configuration options.
- An HTTP request to the Transfer Schedules API.
Before You Begin
Prerequisites
Before configuring this Pipeline, we recommend you first:
- Confirm the cloud storage location from which UDMG will pull files, including the bucket, container, file share, and any relevant path or prefix.
- Verify that the cloud provider credentials have the required permissions to access and read files from that location.
- Test connectivity to the cloud provider and manually verify that the configured credentials can access the expected storage location.
- Identify your local destination directory and ensure that UDMG has the necessary permissions to write files to it.
- Prepare API integration setup and have a UDMG User with domain-level permissions.
Understanding Paths in This Pipeline
When configuring a Remote Cloud Storage to Local Filesystem Pipeline, several path fields determine where files are read from in the cloud storage location and where they are written to on the local filesystem.
Each path has a specific role and is combined during runtime to build the complete source and destination paths used in transfers.
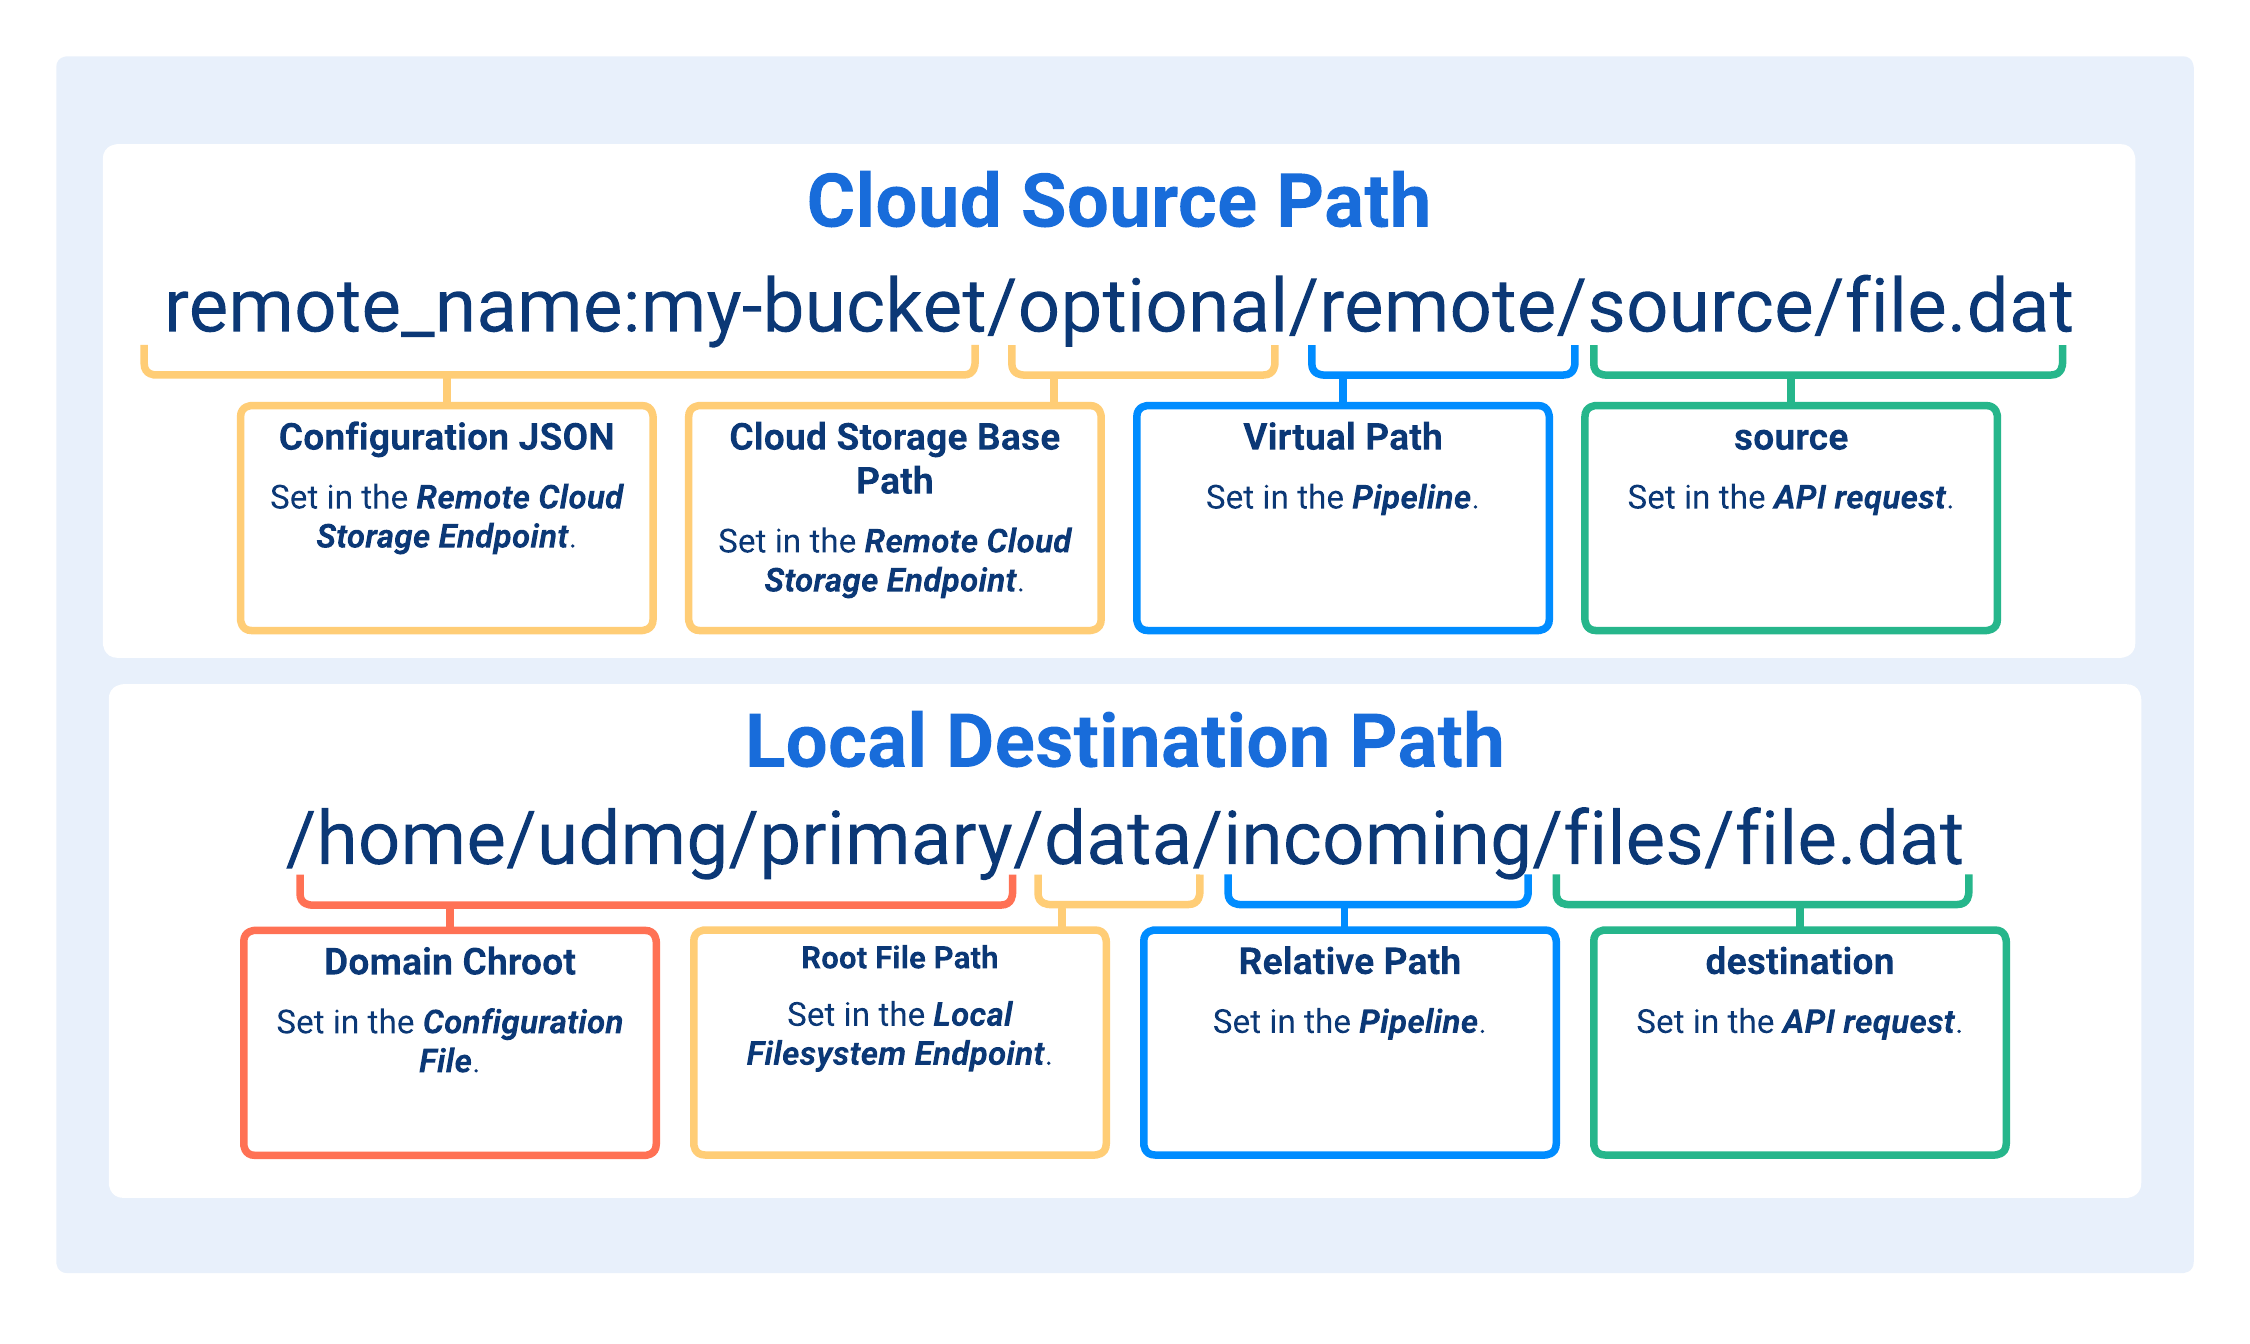
- Configuration JSON
- Cloud Storage Base Path
- Virtual Path
- source
- Domain Chroot
- Root File Path
- Relative Path
- destination
The Configuration JSON defined in the Remote Cloud Storage Endpoint provides the Rclone remote configuration for the selected cloud provider and object storage service.
The structure and required fields of the Configuration JSON depend on the selected cloud provider. For provider-specific examples and requirements, see Configuration JSON.
An optional path defined in the Remote Cloud Storage Endpoint that can be used to define the root location within the Endpoint. For object storage, this path is appended as a suffix to the bucket or container from the Configuration JSON.
Valid formats:
- Leave blank
dirdir/
For more details, see Cloud Storage Base Path.
A path where the source file is located on the remote cloud storage provider. The path is appended to the Cloud Storage Base Path. The additional source property can be appended to this path via the Transfer Schedules API. The path must exist on the remote cloud storage provider and does not accept subdirectories (more than 1 level).
Valid formats:
/(empty path)/dirdir
Regardless of the UDMG Server host operating system, the path must use forward slashes / (Linux path formatting).
The filename and extension of the source file.
The source property can be an empty path when the filename and extension are already specified in the Virtual Path. Otherwise, it must be provided. If needed, the value can also include one or more subdirectories relative to the defined Virtual Path.
Valid formats:
"/filename.ext""/dir/filename.ext""/dir/subdir/filename.ext"
Regardless of the UDMG Server host operating system, the path must use forward slashes / (Linux path formatting).
This path or location on the UDMG host, is determined by the security.domain_chroot argument defined in the Configuration File.
Valid security.domain_chroot values are:
NONE: No path is prepended.WORKDIR: The file path is resolved relative to thework_directory_pathargument defined in the Configuration File (e.g.,/home/udmg/orC:\UDMG\WorkDir\).WORKDIR+DOMAIN: Same asWORKDIR, but UDMG also prepends the Domain name (e.g.,/home/udmg/primary/orC:\UDMG\WorkDir\primary\).
A path defined in the Local Filesystem Endpoint used as the Destination Endpoint for this Pipeline. Directories above this path are not accessible to Pipelines associated with this Endpoint.
The interpretation of the Root File Path depends on the value of security.domain_chroot:
- If
security.domain_chrootis set toNONE, the Root File Path is treated as an absolute path, and should be specified as such. - Otherwise, the Root File Path is treated as relative to the directory defined by
security.domain_chroot(see Domain Chroot).
Valid formats:
/(empty path)/dir/dir/subdirC:\dir\subdir\\[ServerName]\dir\subdir(Windows UNC path)
A path where the destination file is to be written to on the local UDMG server. The path is appended to the Root File Path. The additional destination property can be appended to this path via the Transfers Scheduled API.
Valid formats:
/(empty path)/[dir]/[dir]/[subdir]
The filename and extension of the destination file.
If included, the file will be renamed to the specified name and extension on the local UDMG server. Otherwise, it will keep its original name and extension.
If needed, the value can also include one or more subdirectories relative to the defined Relative Path. Those directories will be created in the local filesystem if they don't already exist.
Valid formats:
"/"(keeps the original source filename)"dir/"or"/dir/"(stores the file in the specified directory while keeping the original source filename; always include the trailing slash to indicate a directory)"/new_filename.ext""/dir/filename.ext""/dir/subdir/filename.ext""/new_dir/new_filename.ext"
For implementation details, see Transfer Scheduling via UDMG REST API.
Remote Cloud Storage Authentication
Pipelines that contain a Remote Cloud Storage Endpoint require credentials to authenticate with the remote cloud storage provider.
UDMG uses a single Credential Type for Remote Cloud Storage Pipelines: Key Pair.
The values stored in the Key Pair Credential (for example, access keys, account keys, or service account credentials) are referenced in the Configuration JSON using variables and are resolved at runtime.
The meaning of each value depends on the selected cloud provider and how the Configuration JSON is defined.
Each Pipeline can only have one Credential associated with it at a time.
Transfer Scheduling via UDMG REST API
In a Remote Cloud Storage to Local Filesystem Pipeline, each transfer must be explicitly scheduled through the UDMG REST API.
API Endpoint
POST /api/v1/domains/${UDMG_DOMAIN_NAME}/transfers/schedules
Request Body
The request body includes the following fields:
| Key | Description | Format | Required |
|---|---|---|---|
pipeline | Name of the Pipeline associated with the transfer. | Must match the Pipeline's Name field. | Yes |
scheduled | Date and time at which the file transfer is scheduled to be initiated. If a past date is provided, the transfer is initiated during the next poll for pending transfers, based on the | Must be in RFC 3339 format (2025-01-01T00:00:00Z). | Yes |
source | Filename and extension (plus optional path) to the source file. For more information, refer to Understanding Paths. |
Regardless of the UDMG Server host operating system, the path must use forward slashes | Yes |
destination | Filename and extension (plus optional path) to the destination file. Can be used for renaming files. For more information, refer to Understanding Paths. |
| No |
Request Example
The following curl command schedules a file transfer using the Transfers Schedules Endpoint:
curl http://<UDMG_HOST>/api/v1/domains/${UDMG_DOMAIN_NAME}/transfers/schedules \\",
  "  -X POST \\",
  '  -H "Content-Type: application/json" \\',
  "  -d '{",
  '    "pipeline": "Pipeline_Pull",',
  '    "scheduled": "2026-07-03T15:43:52.344Z",',
  '    "source": "/Sent/Form1000.dat",',
  '    "destination": "/Form1000.dat"'
    "  }
Responses Example
{
  "scheduleId": 34,
  "pipeline": "Pipeline_Pull",
  "username": "udmg.sys-admin",
  "source": "/virtualpath/Sent/Form1000.dat",
  "destination": "/rootfilepath/relativepath/Form1000.dat",
  "schedule": "2026-07-03T15:43:52.344Z",
  "status": "Pending"
}
Check Transfer Status
Note that the response from the API only indicates that the transfer has been successfully scheduled, not that it has been completed. The transfer's status will be "Pending" until it is executed, at which point the status will update to "Completed" or "Failed" based on the outcome of the transfer.
After a transfer is scheduled, you can check its status by doing a GET request to the Transfers Schedules Endpoint, which returns a list of all scheduled transfers along with their current status.
GET /api/v1/domains/${UDMG_DOMAIN_NAME}/transfers/schedules
Response Example
{
  "schedules": {
    "items": [
      {
        "scheduleId": 34,
        "transferId": 710,
        "pipeline": "Pipeline_Pull",
        "username": "udmg.sys-admin",
        "source": "virtualpath/Sent/Form1000.dat",
        "destination": "/rootfilepath/relativepath/Form1000.dat",
        "schedule": "2026-07-03T15:43:52.344Z",
        "status": "Completed",
        "executedAt": "2026-07-03T15:45:52.344Z",
        "completedAt": "2026-07-03T15:45:52.344Z"
      },
      ...
    ]
  }
}
Pipeline Workflow
The Pipeline Workflow toggle enables automated Task execution during the transfer lifecycle.
When enabled, UDMG Server executes the Tasks associated with the Pipeline Workflow when specific transfer triggers occur.
Tasks are configured separately and can perform actions such as executing system commands or publishing Universal Events to Universal Controller. Multiple Tasks can be executed as part of a workflow, and they run sequentially in the order defined for the Pipeline.
For more information, see Tasks.
Adding a Pipeline
To add a Remote Cloud Storage to Local Filesystem Pipeline, follow these steps:
- From the Sidebar, select Configuration > Pipelines.
- Click Add Pipeline.
- Complete the Name for the new Pipeline.
- Select the Source Endpoint with a Remote Cloud Storage Endpoint type.
- Select the Destination Endpoint with a Local Filesystem Endpoint type.
- Fill out the dynamic fields following the Field Descriptions table.
- Click Add.
UDMG does not allow identical Pipelines to be created, even if they have different names. For more information, see Pipeline Validation.
Field Descriptions
| Name | Description | Specifications | Required |
|---|---|---|---|
| Name | Name of the Pipeline. |
| Yes |
| Description | Description for the Pipeline. | No | |
| Business Service | Assigning a Business Service to this Pipeline restricts updating, deleting, and other actions so only Users with the same Business Service can perform them (role permissions still apply). For details, see Business Services. |
| No |
| Source Endpoint | The Source Endpoint is where files are retrieved, originated, or come from. |
| Yes |
| Destination Endpoint | The Destination Endpoint is where files are delivered to or sent. Allowable Destination Endpoints are based on the available Pipeline combinations. |
| Yes |
| Virtual Path | A path where the source file is located on the remote cloud storage provider. The Transfer Schedules API For more information, refer to Understanding Paths. |
| Yes |
| Credentials Name | The client authentication Credentials used to authenticate to the cloud storage provider. For more information, see Remote Cloud Storage Authentication | Must reference an already-created Key Pair. | Yes |
| Relative Path | The path where the file is to be written to on the local UDMG server. The Transfer Schedules API For more information, refer to Understanding Paths. | Format:
| Yes |
| Workflow Enabled | If enabled, the Pipeline Workflow is enabled and Tasks assigned on the Workflow tab will be executed. For more information, refer to Pipeline Workflow. | No |
Editing a Pipeline
To edit a Remote Cloud Storage to Local Filesystem Pipeline, follow these steps:
- From the Sidebar, select Configuration > Pipelines.
- Click the Name of the Pipeline you want to edit.
- Click the Edit button above the Pipeline details.
- Edit details for the Pipeline.
- The Source Endpoint and Destination Endpoint cannot be changed after creation.
- Click Update.
Pipeline updates are subject to the same validation rules enforced during creation. For more information, see Pipeline Validation.
Managing a Pipeline
All Pipelines support the ability to view the complete Pipeline and linked Endpoint details.
Viewing Pipeline Details
To view the details of a Remote Cloud Storage to Local Filesystem Pipeline, follow these steps:
- From the Sidebar, select Configuration > Pipelines.
- Click the Name of the Pipeline you want to view.
- Click the Overview tab or Details tab to see additional Pipeline and Endpoint details.
Pipeline Metadata
Pipeline details include all parameters given in the Field Descriptions table, plus the following read-only metadata:
| Name | Description |
|---|---|
| UUID | Universally Unique Identifier of this Pipeline. |
| Version | Version number of the configuration. Every change increases the number. |
| Enabled | Pipeline's Enabled status. If enabled, field is set to True. |
| Created | Date and time this Pipeline was created. |
| Updated | Date and time this Pipeline was last updated. |
Enabling and Disabling Pipelines
Pipelines can be Enabled or Disabled to control their active status and ability to participate in file transfers. The status is defaulted to Enabled and can be changed after creation. The Configuration Item's Disabled status does not impact whether it can be configured. Also, Disabled Endpoints can be added to a Pipeline.
- Enabled (default): The Pipeline is active and allows file transfers.
- Disabled: The Pipeline is inactive and does not allow file transfers.
To enable or disable a Pipeline, follow these steps:
- From the Sidebar, select Configuration > Pipelines.
- Click the Name of the Pipeline you want to enable or disable.
- Click the Enable or Disable button above the Pipeline details.
- If the Pipeline is Disabled, then the button displays Enabled. If the Pipeline is Enabled, then the button displays Disabled.
- Click Update.
Changes to a Pipeline's Enabled/Disabled status take effect the next time the Transfers Scheduled API is triggered. Disabling a Pipeline is a safe alternative to deleting it.
Assigning a Task to a Pipeline
To assign a Task to a Pipeline, follow these steps:
- From the sidebar, select Configuration > Pipelines.
- Click the Name of the Pipeline to which you want to assign a Task.
- Click the Workflow tab.
- The Workflow editor displays five columns:
- Available Tasks
- On Staged Tasks
- On Sent Tasks
- On Received Tasks
- On Error Tasks
- Drag and drop Task cards as needed:
- To assign the Task to the Pipeline Workflow, move a card from Available Tasks to one of the trigger columns.
- To unassign the Task from the Pipeline, click the x icon in the top right corner on the Task card.
- Click Cancel to discard all changes.
- Click Update.
Not all Task trigger columns are available for every Pipeline type. For this Pipeline type, the following column is not available: On Staged, On Sent. For more information, see Task Triggers.
Deleting a Pipeline
To delete a Remote Cloud Storage to Local Filesystem Pipeline, follow these steps:
- From the Sidebar, select Configuration > Pipelines.
- Click the Name of the Pipeline you want to delete.
- Click the Delete button above the Pipeline details.
- You will be asked to confirm the deletion. Click Continue.
UDMG prevents the deletion of a Configuration Item if it is currently referenced by another Configuration Item (i.e., Account Group). The Configuration Item must be edited or the reference removed before you can delete the Pipeline. Deletion cannot be undone.
Monitoring a Pipeline
To monitor and determine the status of a Pipeline, the Transfers page and Endpoints page must be monitored to track incoming Transfers and the Source and Destination Endpoints' individual statuses, respectively.
On the Transfers page, the following fields indicate the type of Remote Transfer.
- Is Schedule: If Yes, then the Transfer was a Remote Transfer.
- Is Send: If No, then the Remote Transfer was a pull scenario.
- Schedule ID: The value should match the Schedule ID in the Transfers Schedules API response.
- Protocol: If, Cloud, then the Transfer was using this type of Pipeline.