Local Filesystem to Remote AS2 Server
The Local Filesystem to Remote AS2 Server Pipeline type represents a standard AS2 transfer scenario in which UDMG acts as the sender, pushing files from a local filesystem to your partner's AS2 receiver.
This Pipeline consists of:
- A Local Filesystem Endpoint that represents the location of the files to be transferred (used as the Source Endpoint).
- A Remote AS2 Server Endpoint that represents your partner's AS2 receiver (used as the Destination Endpoint).
- Pipeline-specific configuration options.
- An HTTP request to the Transfers Scheduled API.
Before You Begin
Prerequisites
Before configuring this Pipeline, we recommend you first:
- Obtain your partner's AS2 Server connection details from their administrator, including hostname, port, and authentication credentials.
- Identify your local source directory and ensure that UDMG has the necessary permissions to read files from it.
- Test network connectivity to your partner's AS2 Server and manually verify that authentication succeeds.
- Prepare API integration setup and have a UDMG User with domain-level permissions.
- If using Asynchronous MDN Required as the MDN Disposition Mechanism, ensure the UDMG Server configuration file includes
hook_server.enableandhook_server.enable_mdnset totrue. Without both settings, the Remote AS2 Server Endpoint will fail to start. - If your AS2 partner requires Basic Authentication, create a Username and Password credential before configuring this Pipeline.
Understanding Paths in This Pipeline
When configuring a Local Filesystem to Remote AS2 Server Pipeline, several path fields determine where files are read from locally and where they are sent to.
Each path has a specific role and is combined during runtime to build the complete source path and destination URL used in transfers.
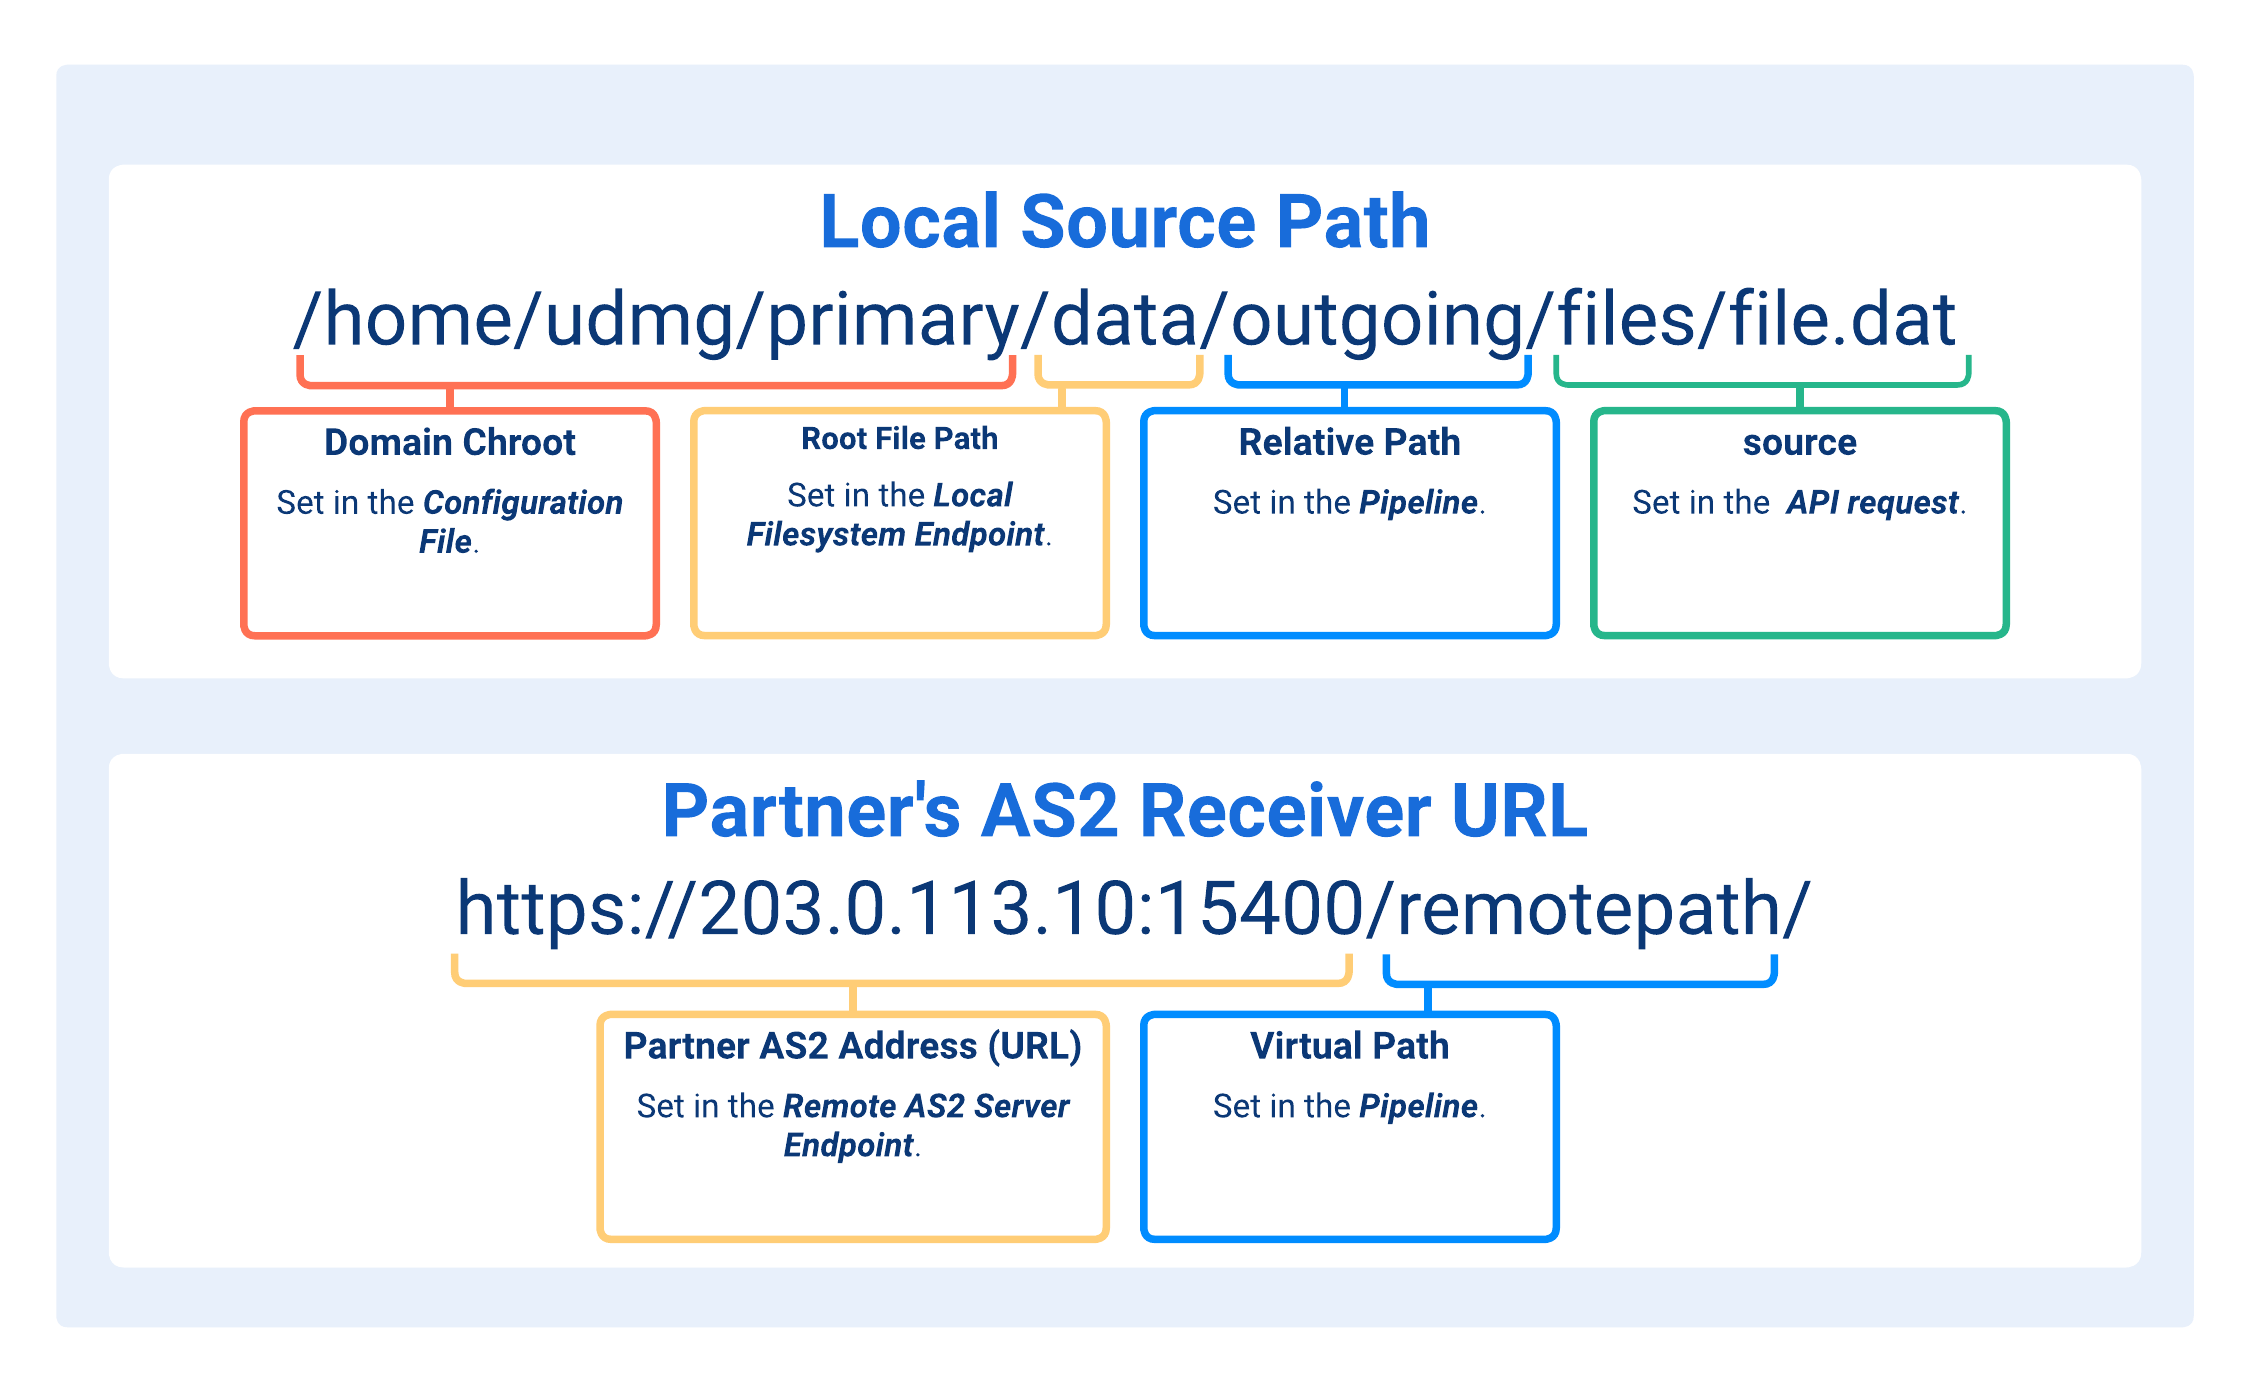
- Domain Chroot
- Root File Path
- Relative Path
- source
- Partner AS2 Address (URL)
- Virtual Path
This path or location on the UDMG host is determined by the security.domain_chroot argument defined in the Configuration File.
Valid security.domain_chroot values are:
NONE: No path is prepended.WORKDIR: The file path is resolved relative to thework_directory_pathargument defined in the Configuration File (e.g.,/home/udmg/orC:\UDMG\WorkDir\).WORKDIR+DOMAIN: Same asWORKDIR, but UDMG also prepends the Domain name (e.g.,/home/udmg/primary/orC:\UDMG\WorkDir\primary\).
A path defined in the Local Filesystem Endpoint used as the Source Endpoint for this Pipeline. Directories above this path are not accessible to Pipelines associated with this Endpoint.
The interpretation of the Root File Path depends on the value of security.domain_chroot:
- If
security.domain_chrootis set toNONE, the Root File Path is treated as an absolute path, and should be specified as such. - Otherwise, the Root File Path is treated as relative to the directory defined by
security.domain_chroot(see Domain Chroot). A path beginning with/is not treated as a filesystem root — the leading/is accepted in the format but the path resolves relative to the chroot base. For example, withWORKDIR+DOMAINand work directory/home/udmg/, entering/uploadsresolves to/home/udmg/<domain>/uploads.
Valid formats:
/(empty path)/dir/dir/subdirC:\dir\subdir\\[ServerName]\dir\subdir(Windows UNC path)
A base path used to locate files within this Pipeline.
Valid formats:
/(empty path)/dir/dir/subdir/filename.ext(in this case, the Pipeline always pushes the same file).
If the Relative Path includes the filename and extension, the corresponding
source value should be "/" (see
Request Body).
The filename and extension of the source file.
The source property can be an empty path when the filename and extension are already specified in the Relative Path. Otherwise, it must be provided.
If needed, the value can also include one or more subdirectories relative to the defined Relative Path.
Valid formats:
"/"(only iffilename.extis already specified in the Relative Path)"/filename.ext""/dir/filename.ext""/dir/subdir/filename.ext"
Wildcards are supported. For implementation details, see Wildcards.
The URL used by your partner's AS2 receiver to accept incoming messages.
It includes the IP address or domain name, port, and an optional path.
It is defined in the Remote AS2 Server Endpoint.
Final path appended to the URL provided in the Endpoint's Partner AS2 Address (URL). The path does not accept subdirectories (more than 1 level).
Valid formats:
//path
Leave as / if the full URL is already provided in the Endpoint's Partner AS2 Address (URL).
Authentication to Partner's AS2 Server
When UDMG connects to your partner's AS2 receiver as a sender, authentication can occur in one of two ways, depending on the receiver's configuration and how it responds during the initial HTTP or HTTPS handshake.
Partner ID and Certificate Mapping (Standard)
This is the default and most common AS2 authentication method, where:
- UDMG identifies itself using the Local AS2 Identifier, Remote Partner AS2 Identifier, Credentials Name (AS2 TLS Certificate Pair), and Credentials Name (Partner X.509 Certificate) fields configured in the Remote AS2 Server Endpoint.
- The partner's AS2 receiver validates this identifier against its own configuration, using the digital certificate previously exchanged between both parties.
- Authentication and trust are fully managed through the AS2 protocol's built-in signing and encryption mechanisms (no additional credentials are required).
Partner ID, Certificate, and Basic Authentication
Some partners require Basic Authentication before AS2 message exchange begins. UDMG handles this using the Username and Password credential set in the Pipeline's Credentials Name field.
Authentication Flow
UDMG determines which authentication path to use based on two factors:
| Credentials Were Added to the Pipeline | The AS2 Receiver Requires Basic Auth | Behavior |
|---|---|---|
| UDMG performs Basic Auth (using the supplied credentials), then proceeds with Partner ID-Certificate mapping for AS2 message exchange. | ||
| UDMG proceeds with standard Partner ID-Certificate mapping only. | ||
| Connection fails with an authentication error. | ||
| UDMG sends the Basic Auth header preemptively. The receiver ignores it and the transfer proceeds normally. |
Partner Configuration
When UDMG acts as the AS2 sender, your partner must configure their AS2 receiver to accept incoming messages from UDMG. The tables below list the required and optional settings your partner needs to configure in their AS2 software, along with where to find each value in your UDMG configuration.
Required
| Setting | Value | Where to Find It |
|---|---|---|
| AS2-From | UDMG's AS2 identifier | Local AS2 Identifier field on the Remote AS2 Server Endpoint. |
| AS2-To | Partner's own AS2 identifier | Configured by the partner in their AS2 software; must match the Remote Partner AS2 Identifier on the Remote AS2 Server Endpoint. |
| Signature verification certificate | UDMG's public X.509 certificate | Exported from the Credentials Name (AS2 TLS Certificate Pair) credential on the Remote AS2 Server Endpoint. Share this with the partner directly. The partner uses it to verify the digital signature on incoming messages from UDMG. |
| Decryption key | Partner's own private key | Already held by the partner. UDMG encrypts outbound messages using the partner's public certificate configured in Credentials Name (Partner X.509 Certificate) on the Remote AS2 Server Endpoint. |
| MDN | Synchronous | The partner must return an MDN synchronously in the same HTTP response. |
Optional
| Setting | Purpose |
|---|---|
| Message compression | UDMG compresses the outbound payload when Compress AS2 Payload is enabled on the Remote AS2 Server Endpoint. The partner's AS2 software must support ZLIB decompression to receive compressed messages. |
| Basic Authentication | If the partner's AS2 receiver requires Basic Auth before accepting the message, configure the Credentials Name field on this Pipeline. See Authentication to Partner's AS2 Server. |
Transfer Scheduling via UDMG REST API
In a Local Filesystem to Remote AS2 Server Pipeline, each transfer must be explicitly scheduled through the UDMG REST API.
API Endpoint
POST /api/v1/domains/{domainName}/transfers/schedules
Request Body
The request body includes the following fields:
| Key | Description | Format | Required |
|---|---|---|---|
pipeline | Name of the Pipeline associated with the transfer. | Must match the Pipeline's Name field. | Yes |
scheduled | Date and time at which the file transfer is scheduled to be initiated. If a past date is provided, the transfer is initiated during the next poll for pending transfers, based on the | Must be in RFC 3339 format (2025-01-01T00:00:00Z). | Yes |
source | Filename and extension (plus optional path) to the source file. For more information, refer to Understanding Paths. |
| Yes |
destination | Filename and extension (plus optional path) to the destination file. Can be used for renaming files. For more information, refer to Understanding Paths. |
| No |
Request Example
The following curl command schedules a file transfer using the Transfers Schedules Endpoint:
curl https://<udmg-host>:<port>/api/v1/domains/<domain-name>/transfers/schedules \
  -X POST \
  -d '{
    "pipeline": "Pipeline_Push",
    "scheduled": "2026-07-03T15:43:52.344Z",
    "source": "/Form1000.dat",
    "destination": "/Received/Form1000.dat"
  }'
Response Example
{
    "scheduleId": 33,
    "pipeline": "Pipeline_Push",
    "username": "udmg.sys-admin",
    "source": "/rootfilepath/relativepath/Form1000.dat",
    "destination": "/virtualpath/Received/Form1000.dat",
    "schedule": "2026-07-03T15:43:52.344Z",
    "status": "Pending"
  }
Check Transfer Status
Note that the response from the API only indicates that the transfer has been successfully scheduled, not that it has been completed. The transfer's status will be "Pending" until it is executed, at which point the status will update to "Completed" or "Failed" based on the outcome of the transfer.
After a transfer is scheduled, you can check its status by doing a GET request to the Transfers Schedules Endpoint, which returns a list of all scheduled transfers along with their current status.
GET /api/v1/domains/{domainName}/transfers/schedules
Response Example
   {
    "schedules": {
        "items": [
            {
                "scheduleId": 33,
                "transferId": 709,
                "pipeline": "Pipeline_Push",
                "username": "udmg.sys-admin",
                "source": "/rootfilepath/relativepath/Form1000.dat",
                "destination": "/virtualpath/Received/Form1000.dat",
                "schedule": "2026-07-03T15:43:52.344Z",
                "status": "Completed",
                "executedAt": "2026-07-03T15:45:52.344Z",
                "completedAt": "2026-07-03T15:45:52.344Z"
        }
Pipeline Workflow
The Pipeline Workflow toggle enables automated Task execution during the transfer lifecycle.
When enabled, UDMG Server executes the Tasks associated with the Pipeline Workflow when specific transfer triggers occur.
Tasks are configured separately and can perform actions such as executing system commands or publishing Universal Events to Universal Controller. Multiple Tasks can be executed as part of a workflow, and they run sequentially in the order defined for the Pipeline.
For more information, see Tasks.
Adding a Pipeline
To add a Local Filesystem to Remote AS2 Server Pipeline, follow these steps:
- From the Sidebar, select Configuration > Pipelines.
- Click Add Pipeline.
- Complete the Name for the new Pipeline.
- Select the Source Endpoint with a Local Filesystem Endpoint type.
- Select the Destination Endpoint with a Remote AS2 Server Endpoint type.
- Fill out the dynamic fields following the Field Descriptions table.
- Click Add.
UDMG does not allow identical Pipelines to be created, even if they have different names. For more information, see Pipeline Validation.
Field Descriptions
| Name | Description | Specifications | Required |
|---|---|---|---|
| Name | The name of the Pipeline. |
| Yes |
| Description | The description of the Pipeline. | No | |
| Business Service | Assigning a Business Service to this Pipeline restricts updating, deleting, and other actions so only Users with the same Business Service can perform them (role permissions still apply). For details, see Business Services. |
| No |
| Source Endpoint | The Source Endpoint is where files are retrieved, originated, or come from. |
| Yes |
| Destination Endpoint | The Destination Endpoint is where files are delivered to or sent. Allowable Destination Endpoints are based on the available Pipeline combinations. |
| Yes |
| Relative Path | Path to the directory where the source file is located. For more information, see Understanding Paths. |
| Yes |
| Virtual Path | Path where the destination file will be written on your partner's AS2 receiver. For more information, see Understanding Paths. |
| Yes |
| Credentials Name | The Username and Password Credentials used to perform HTTP Basic Authentication to your partner's AS2 receiver, before the AS2 message exchange begins. | Must reference an existing Username and Password. | Yes, if your AS2 partner requires Basic Authentication. |
| Workflow Enabled | If enabled, the Pipeline Workflow is enabled and Tasks assigned on the Workflow tab will be executed. For more information, see Pipeline Workflow. | No |
Editing a Pipeline
To edit a Local Filesystem to Remote AS2 Server Pipeline, follow these steps:
- From the Sidebar, select Configuration > Pipelines.
- Click the Name of the Pipeline you want to edit.
- Click the Edit button above the Pipeline details.
- Edit details for the Pipeline.
- The Source Endpoint and Destination Endpoint cannot be changed after creation.
- Click Update.
Upon Pipeline update, UDMG checks for Endpoint Source + Endpoint Destination + Configuration + Virtual Path uniqueness.
Managing a Pipeline
All Pipelines support the ability to view the complete Pipeline and linked Endpoint details.
Viewing Pipeline Details
To view the details of a Local Filesystem to Remote AS2 Server Pipeline, follow these steps:
- From the Sidebar, select Configuration > Pipelines.
- Click the Name of the Pipeline you want to view.
- Click the Overview Tab or Details Tab to see additional Pipeline and Endpoint details.
Pipeline Metadata
Pipeline details include all parameters given in the Field Descriptions table, plus the following read-only metadata:
| Name | Description |
|---|---|
| UUID | Universally Unique Identifier of this Pipeline. |
| Version | Version number of the configuration. Every change increases the number. |
| Enabled | Pipeline's Enabled status. If enabled, field is set to True. |
| Created | Date and time this Pipeline was created. |
| Updated | Date and time this Pipeline was last updated. |
Enabling and Disabling Pipelines
Pipelines can be Enabled or Disabled to control their active status and ability to participate in file transfers. The status is defaulted to Enabled and can be changed after creation. The Configuration Item's Disabled status does not impact whether it can be configured. Also, Disabled Endpoints can be added to a Pipeline.
- Enabled (default): The Pipeline is active and allows file transfers.
- Disabled: The Pipeline is inactive and does not allow file transfers.
To enable or disable a Pipeline, follow these steps:
- From the Sidebar, select Configuration > Pipelines.
- Click the Name of the Pipeline you want to enable or disable.
- Click the Enable or Disable button above the Pipeline details.
- If the Pipeline is Disabled, then the button displays Enabled. If the Pipeline is Enabled, then the button displays Disabled.
- Click Update.
Changes to a Pipeline's Enabled/Disabled status take effect the next time the Transfers Scheduled API is triggered. Disabling a Pipeline is a safe alternative to deleting it.
Assigning a Task to a Pipeline
To assign a Task to a Pipeline, follow these steps:
- From the sidebar, select Configuration > Pipelines.
- Click the Name of the Pipeline to which you want to assign a Task.
- Click the Workflow tab.
- The Workflow editor displays five columns:
- Available Tasks
- On Staged Tasks
- On Sent Tasks
- On Received Tasks
- On Error Tasks
- Drag and drop Task cards as needed:
- To assign the Task to the Pipeline Workflow, move a card from Available Tasks to one of the trigger columns.
- To unassign the Task from the Pipeline, click the x icon in the top right corner on the Task card.
- Click Cancel to discard all changes.
- Click Update.
Not all Task trigger columns are available for every Pipeline type. For this Pipeline type, the following columns are not available: On Staged and On Received. For more information, see Task Triggers.
Deleting a Pipeline
To delete a Local Filesystem to Remote AS2 Server Pipeline, follow these steps:
- From the Sidebar, select Configuration > Pipelines.
- Click the Name of the Pipeline you want to delete.
- Click the Delete button above the Pipeline details.
- You will be asked to confirm the deletion. Click Continue.
Monitoring a Pipeline
To monitor and determine the status of a Pipeline, the Transfers page and Endpoints page must be monitored to track incoming Transfers and the Source and Destination Endpoints' individual statuses, respectively.
On the Transfers page, the following fields indicate the type of Transfer:
- Is Schedule: If Yes, then the Transfer was a Remote Transfer.
- Is Send: If Yes, then the Remote Transfer was a push scenario.