Installing Apache Tomcat
Apache Tomcat version 10.1.x is supported.
Install Apache Tomcat
Perform the following steps to install Apache Tomcat (download and installation procedure for Apache Tomcat may vary a bit for each platform):
Step 1 | Select an appropriate method of installation: Windows
Windows or Linux/Unix
Linux/Unix: Redhat and Centos distributions |
|---|---|
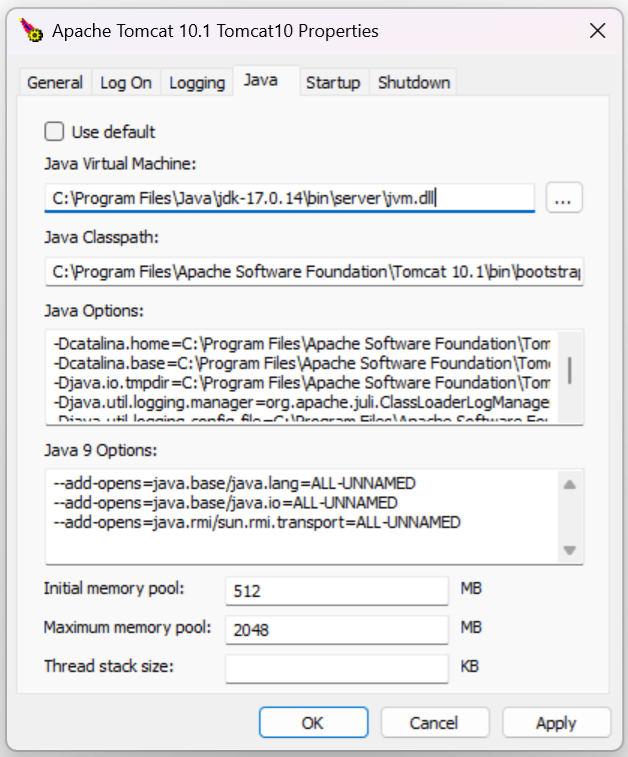
Step 2 | In order to accommodate large workloads, Universal Controller requires that you configure the Java heap size options using the CATALINA_OPTS environment variable. The minimum recommended configurations are as follows. z/Linux: All other platforms: If you have installed Tomcat as a service on Windows, see Windows Service, below; otherwise, see All Platforms: All Platforms A recommended way to set the CATALINA_OPTS environment variable is to use the optional The script is placed into either the CATALINA_BASE/bin or CATALINA_HOME/bin directory and is named info The CATALINA_BASE environment variable specifies location of the root directory of the "active configuration" of Tomcat. It is optional. It defaults to be equal to CATALINA_HOME. By default, the For example, to configure the CATALINA_OPTS environment variable for Java 8, you can create the following script file: On Windows,
On Linux/Unix,
For additional Tomcat configuration details, including CATALINA_OPTS, see RUNNING.txt. Windows Service If you installed Tomcat as a Windows service, you can set values using the Enter the parameters as follows (for Tomcat 10.1.x):
info Later, after you start Tomcat and log in to the Controller, you can validate these settings by running the Memory Usage operation, as follows:
|
Start and Validate Apache Tomcat
Perform the following steps to start and validate Apache Tomcat:
Step 1 | Tomcat is normally run as a system service or daemon. You can start Tomcat using the standard method for your operating system or by using a script, as follows: Windows Linux Windows or Linux |
|---|---|
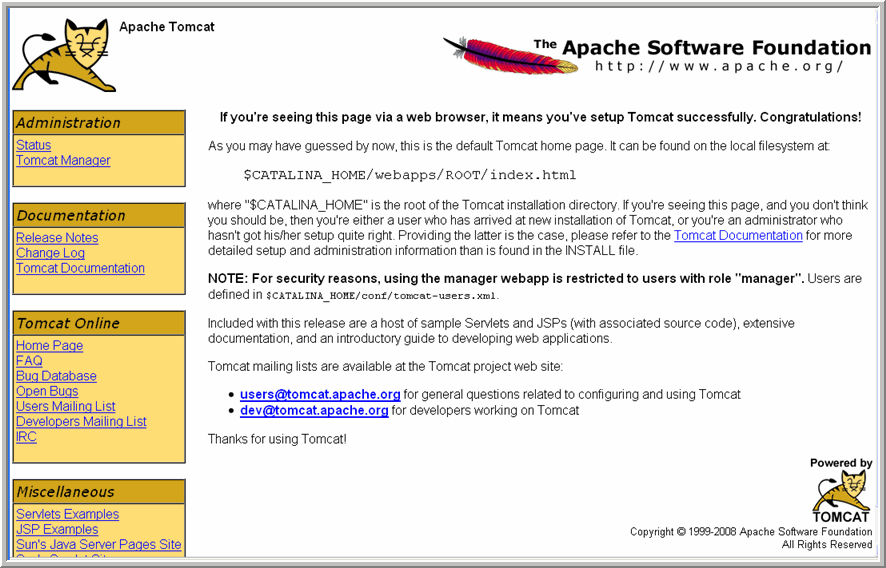
Step 2 | Open a browser and go to the following URL: http://localhost:8080. |
Step 3 | The following screen displays, verifying that you have successfully installed and started Tomcat:
|
Troubleshooting
Tomcat Post Limit: STATUS_MAX_POST_SIZE_EXCEEDED
Problem
The following error message displays:
The server did not receive the data that was sent to it. Please see the documentation for isc.RPCResponse.STATUS_MAX_POST_SIZE_EXCEEDED
Resolution
Remove the post limit by specifying the following attribute on the <Connector> element in conf/server.xml:
maxPostSize="-1"
Special Characters Not Displaying Correctly
Problem
Some special characters not getting displayed correctly in your browser GUI.
Resolution
Tomcat on Windows requires you to define code page UTF-8 as the default code page for war files.
To do this, add the following to the Java options statement just as you did with the memory parameter:
-Dfile.encoding=UTF8