Cluster Nodes
Cluster Nodes are Universal Controller instances in a Universal Automation Center system.
Universal Automation Center contains more than one cluster node only if it is operating in a High Availability environment.
Displaying Information About Cluster Nodes
When you start a cluster node for the first time, the Controller automatically creates a database record for that cluster node. You can view these records for details and status information.
Step 1 | From the Agents & Connections navigation pane, select System > Cluster Nodes. The Cluster Nodes list displays:
|
|---|---|
Step 2 | To display the Details for a cluster node on the list, click the Details icon next to the Node Id, or click anywhere in the row. |

Cluster Node Details
For information on how to access additional details - such as Metadata and complete database Details - for Cluster Nodes (or any type of record), see Records.
Cluster Node Details Field Descriptions
The following tables describe the fields on the Cluster Nodes Details
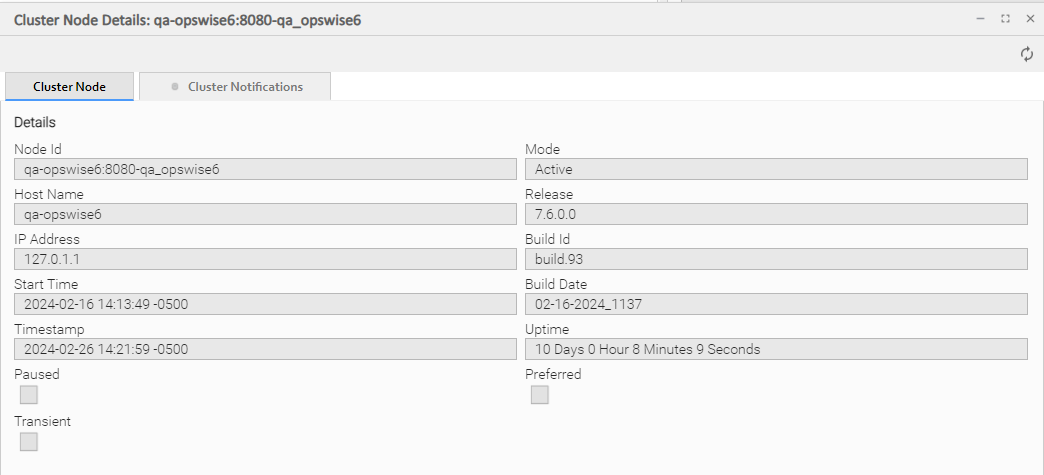
Details
This section contains detailed information about the cluster node.
Field Name | Description |
|---|---|
Node ID | hostname:port-database_name of the cluster node. |
Mode | Current mode of the cluster node:
(See Passive Cluster Node Restrictions for further information on Passive cluster node capabilities.) |
Host Name | User-provided during installation; IP address or domain/name of the host machine where the resource resides. |
Release | System-supplied; release number for this node. Support purposes only. |
IP Address | System-supplied; IP address of this node. |
Build ID | System-supplied; build ID for this node. Support purposes only. |
Start Time | System-supplied; date and time this node was last started. |
Build Date | System-supplied; build date for this node. Support purposes only. |
Timestamp | System-supplied; date and time of this node's last heartbeat. |
Uptime | System-supplied; amount of time this node has been running. |
Paused | Indication that this node has been paused. |
Preferred | Indication that this node is set as Preferred. |
Transient | Indication that this node is set as Transient. |
Metadata
This section contains Metadata information about this record.
Field Name | Description |
|---|---|
UUID | Universally Unique Identifier of this record. |
Updated By | Name of the user that last updated this record. |
Updated | Date and time that this record was last updated. |
Created By | Name of the user that created this record. |
Created | Date and time that this record was created. |
Buttons
This section identifies the buttons displayed above and below the Cluster Node Details that let you perform various actions.
Field Name | Description |
|---|---|
Refresh | Refreshes any dynamic data displayed in the Details. |
Tabs
This section identifies the tabs across the top of the Cluster Node Details that provide access to additional information about the cluster node.
Field Name | Description |
|---|---|
Cluster Notifications | Lists all notifications that have been defined for this cluster node. |
Starting/Stopping Cluster Nodes
For instructions on starting and stopping cluster nodes, see Starting and Stopping Universal Controller.
Sending Notifications on Status of a Cluster Node
You can configure Cluster Nodes to send a notification via email or SNMP when the resource goes Offline or becomes Active.
Step 1 | From the Agents and Connections navigation pane, select System > Cluster Nodes. The Cluster Nodes list displays. |
|---|---|
Step 2 | Click the Details icon next to the Node ID of a Cluster Node, or click anywhere in the Cluster Node row, to display Details about the Cluster Node. |
Step 3 | Click the Cluster Notifications tab to display a list of any Email and SNMP notifications configured for the Cluster Node. |
Step 4 | Select the type of notification you want the Cluster Node to send, and then click New. Notification Details for a new Notification displays (see Email Notification Details and SNMP Notification Details, below). |
Step 5 | Complete the fields as needed (see Email Notification Details Field Descriptions and SNMP Notification Details Field Descriptions, below). info Cluster Node built-in variables are available to pass data about the Cluster Node into the notification. (User-defined variables, including Global variables, are not available for use in Cluster Node email notifications). |
Step 6 | Click a Save button to save the record. |
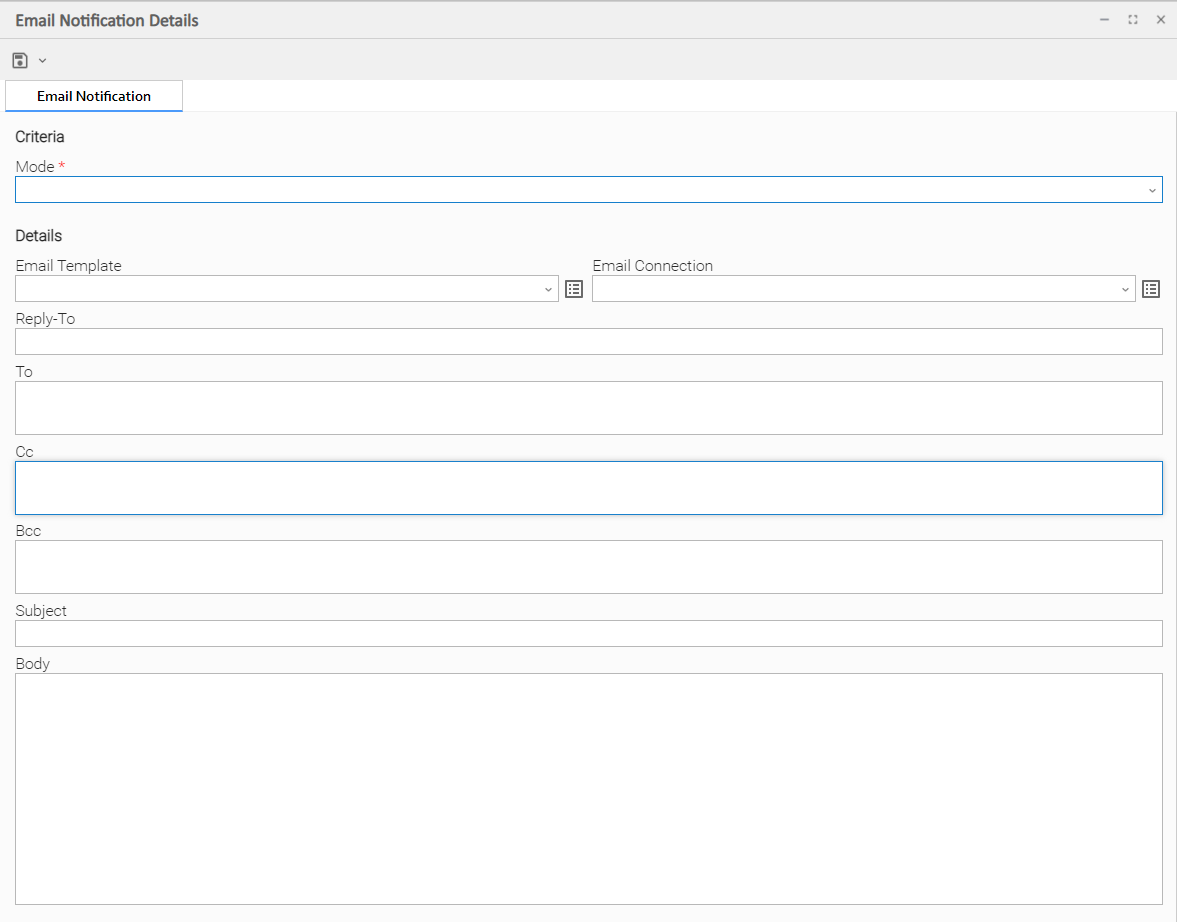
Email Notification Details
Email Notification Details Field Descriptions
The following tables describe the fields and buttons on Email Notification Details.
Criteria
This section contains criteria for sending the notification.
Field Name | Description |
|---|---|
Mode | Options:
|
Details
This section contains assorted detailed information about the notification.
Field Name | Description |
|---|---|
Email Template | Name of an Email template defined in an Email Template Details. An Email template allows you to specify standard recipients and text for outgoing emails. Enter the name of an existing Email template, select an Email template from the drop-down list, or click the Details icon to create a new Email template. Every Email template specifies an Email connection. If you do not specify an Email template in this field, you must specify an Email connection in the Email Connection field. If you specify both an Email template (in this field) and an Email Connection, the Email server specified in the Email Connection field overrides the Email server specified in this field. (Any information specified in an Email task overrides what is specified in an Email template.) |
Email Connection | Required if an Email Template is not specified in the Email Template field; Name of an outgoing Email Connection (Type = Outgoing). An Email Connection specifies information about an outgoing or incoming email server. Enter the name of an existing outgoing Email Connection, select an existing outgoing Email Connection from the drop-down list, or clear the Email Connection field and click the Details icon to create a new Email Connection (Outgoing will be pre-selected in the Type field). If you specify both an Email Template and an Email Connection (in this field), the Email Connection specified in this field overrides the Email Connection specified in the Email Template field. |
Reply-To | Email address of the sender. Use commas to separate multiple recipients. Variables and functions supported. |
To | Email address of the recipient. Use commas to separate multiple recipients. Variables and functions supported. |
CC | Email address of the party being sent a copy of the email, if any. Use commas to separate multiple recipients. Variables and functions supported. |
BCC | Email address of the party being sent a blind (hidden) copy of the email, if any. Use commas to separate multiple recipients. Variables and functions supported. |
Subject | Subject line of the email. Variables and functions supported. |
Body | Text of the email message. Variables and functions supported. info If both the Email Template and the Email Task (or Email Notification) contain text in the Body, the text in the Email Template is appended to the text in the Email Task (or Email Notification). |
Buttons
This section identifies the buttons displayed above and below the Notification Details that let you perform various actions.
Field Name | Description |
|---|---|
Save | Submits the new record to the database. |
Save & New | Saves a new record in the Controller database and redisplays empty Details so that you can create another new record. |
Save & View | Saves a new record in the Controller database and continues to display that record. |
Update | Saves updates to the record. |
Delete | Deletes the current record. |
Refresh | Refreshes any dynamic data displayed in the Details. |
Close | For pop-up view only; closes the pop-up view of this notification. |
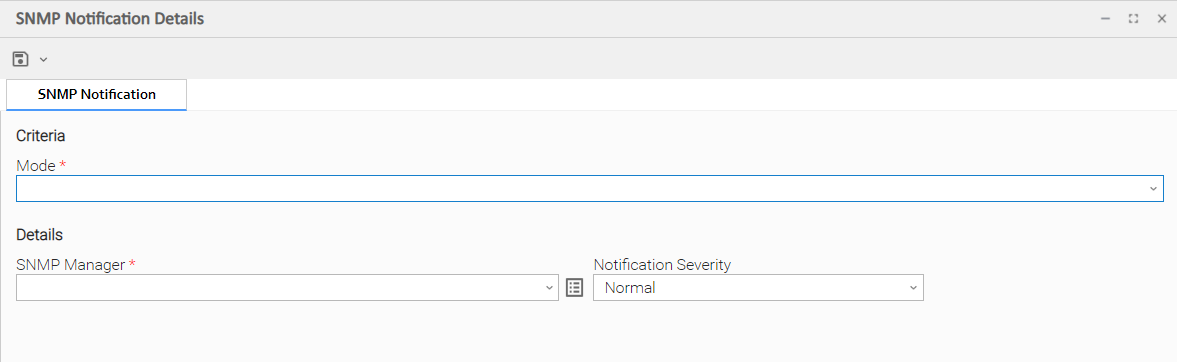
SNMP Notification Details
SNMP Notification Details Field Descriptions
The following tables describe the fields and buttons on SNMP Notification Details.
Criteria
This section contains criteria for sending the notification.
Field Name | Description |
|---|---|
Mode | Options:
|
Details
This section contains assorted detailed information about the notification.
Field Name | Description |
|---|---|
SNMP Manager | The SNMP Manager that will receive the SNMP notification. Enter the name of an existing SNMP Manager, select an existing SNMP Manager from the drop-down list, or clear the SNMP Manager field and click the Details icon to create a new SNMP Manager. |
Notification Severity | Severity of this notification. Options:
|
Buttons
This section identifies the buttons displayed above and below the Notification Details that let you perform various actions.
Field Name | Description |
|---|---|
Save | Submits the new record to the database. |
Save & New | Saves a new record in the Controller database and redisplays empty Details so that you can create another new record. |
Save & View | Saves a new record in the Controller database and continues to display that record. |
Update | Saves updates to the record. |
Delete | Deletes the current record. |
Refresh | Refreshes any dynamic data displayed in the Details. |
Close | For pop-up view only; closes the pop-up view of this notification. |
Designating a Cluster Node as Preferred
You can designate a particular Cluster Node as preferred so that it will always be the Active node if it is running.
In a clustered environment, there may be one node in the cluster that you want to always be the Active node. Designating one node in the cluster as Preferred will cause that node to always assume the role of the Active node when it is running.
Step 1 | From the Services navigation pane, select System > Cluster Nodes to display the Cluster Nodes list. |
|---|---|
Step 2 | Locate the Cluster Node you want to designate as Preferred. |
Step 3 | Right-click the Cluster Node Name on the list or right-click on the Cluster Node Details to access the Action Menu. |
Step 4 | Click Set Node Preferred. |